Looking for a quick, easy gift? Or maybe a craft that’s easy to do with kids? Either way, learning how to make a potholder is a fun craft for all ages.
To make a potholder with cotton loops, you’ll lay all the loops out in the first layer, then you will weave over under with the cotton loops in the other direction. To make it with t-shirt yarn, you will start on the first peg and weave to the opposite peg, then you will weave across and back down to take your t-shirt yarn in a square.
Using cotton loops is the most common way to make potholders, but upcycling old t-shirts into potholders is also a great way to make potholders and it’s good for the environment.
Let’s get into the step-by-step of how to make a potholder on a loom.
Disclaimer: This post contains affiliate links. This means I may earn a commission should you choose to make a purchase using my link
Table of Contents
How to Make a Potholder on a Pin Loom
A pin loom is the kind of loom that is used to make a pot holder. You can buy a pot holder loom/pin loom (Like this one on Amazon) or you can make your own pin loom by following my tutorial here.
First, I’m going to show you how to use cotton loops for potholder weaving.
Cotton Loops
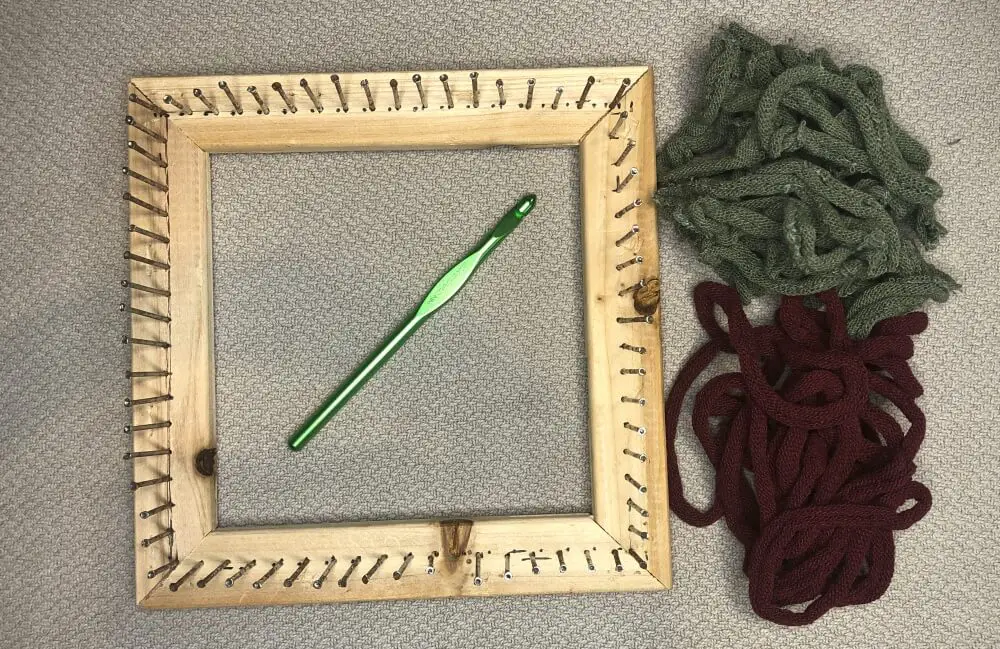
1. Gather Materials
To make a potholder using cotton loops you’ll need a few things to get started. I’ll link to some of the items on Amazon for you (I’ll get a small commission if you make a purchase using my links).
- Potholder loom (Friendly Loom, loops included, see on Amazon)
- Cotton loops/Potholder loops(Rainbow loops, makes six potholders, see on Amazon)
- Crochet hook
That’s it! No seriously, that’s all you need. Making pot holders is pretty simple. But don’t take my word for it, I’ll show you how.
In this tutorial I’m going to be using the pin loom I made myself so it might look a little different than yours but the steps will be the same.
My pin loom has sixteen pegs on each side, your loom might have more and the only difference is a larger loom will make larger potholders.
2. Setting First Layer
First, you’ll lay down your first layer of cotton loops. For this pot holder, I’m going to be using two colors, One color for the first layer and a different color for the second layer, which is a plain weave pattern.
You can find more easy patterns at the end of this post.
To lay your first layer of loops, you’ll start on one corner of the loom and fill all the pins in the rows going top to bottom. Put one end of the loop over the loom peg, stretch it across, and put the other end on the corresponding loop.
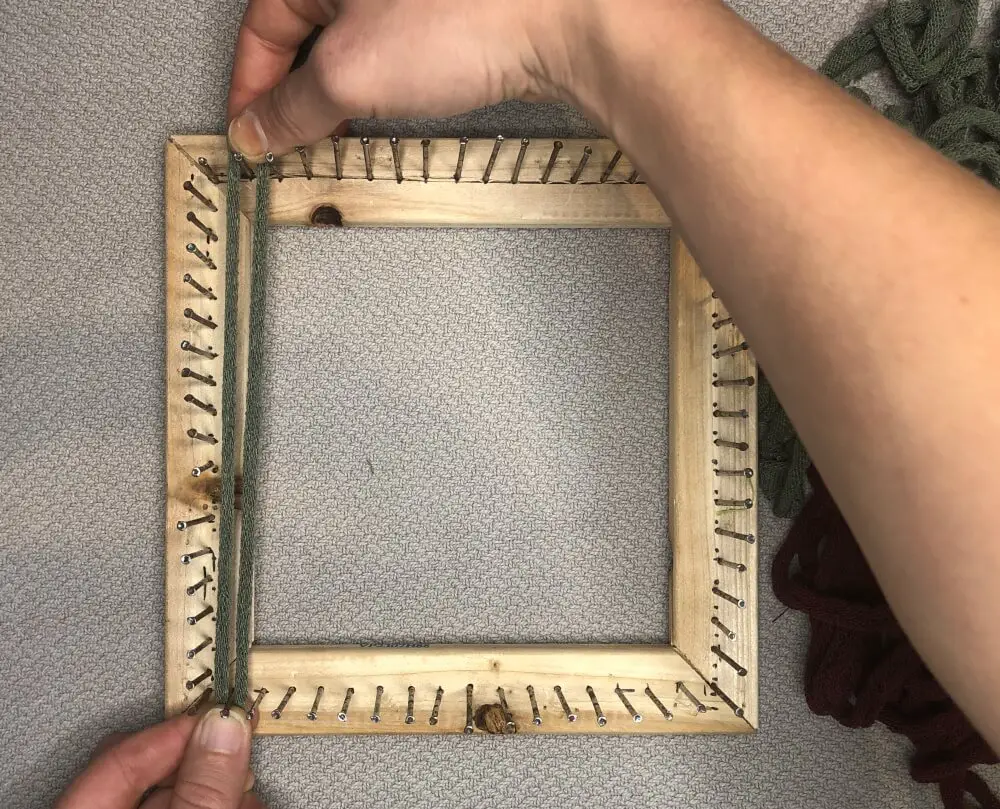
Make sure you’re using the pegs directly across from one another so you don’t get a slanted weave.
Continue filling the pegs until all pegs are full going from the top to bottom. Your loom should look like this:

3. Weaving Second Layer
This is where the real weaving happens, and if you’re using a specific pattern, it’s where the pattern will begin taking shape.
The pattern I am using will use a second contrasting color all the way across.
To weave your second layer, begin with your first peg on the pegs going left to right. You will go over and then under each individual strand all the way across.
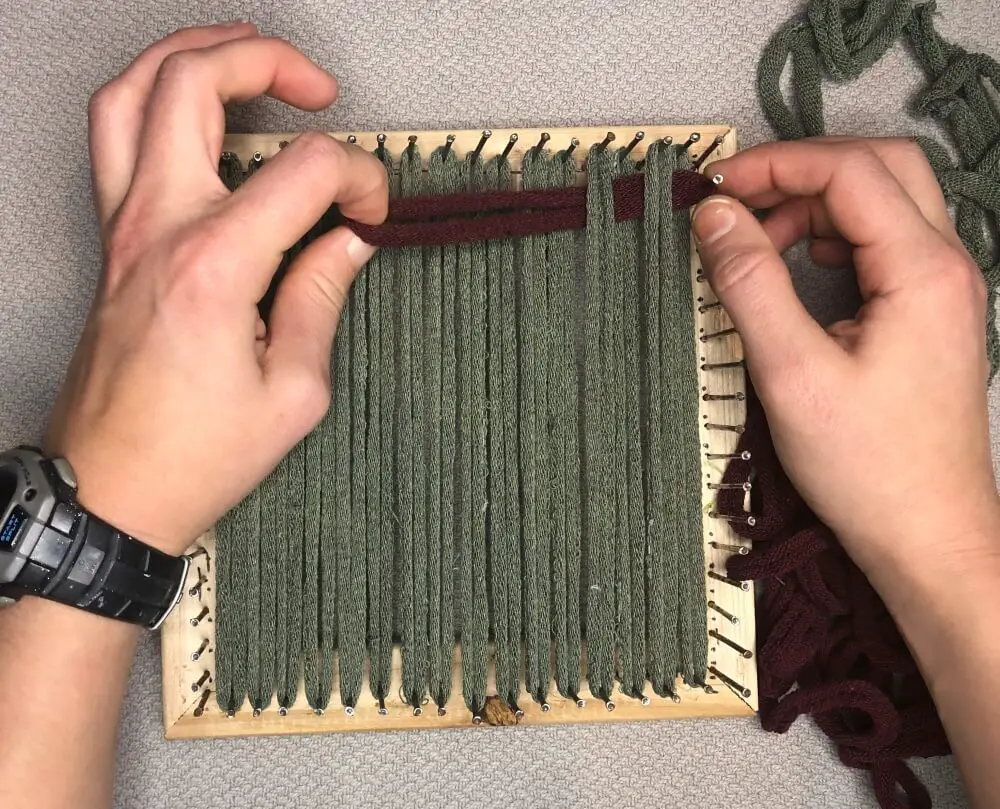
You can do this with your fingers or use a crochet hook. For the next loop, you will go over under all the way across, but you will do the opposite of the previous row.
For example, if you started going over the first loop in the previous row, this time you will start going under the first loop.
Continue in this way until you fill all your pegs. As you get towards the end, it will get harder to weave the loop under, if you’ve been using your fingers you will probably have to switch to a crochet hook.
To help give yourself extra space, you can push the rows up into one another like this:
Now that your weave is complete, it’s time to bind off your potholder.
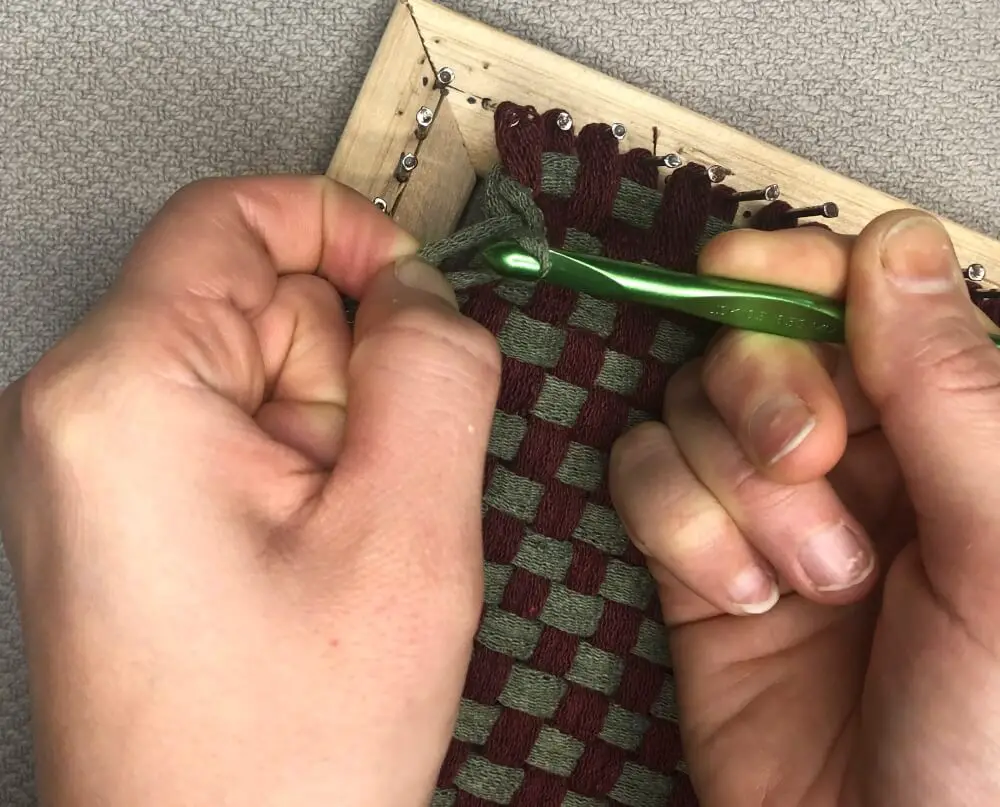
4. Bind Off Potholder
To bind off your potholder, you will take your crochet hook and put it through the corner loop of your loom.
Slip this loop off the peg and put your crochet hook through the next loop.
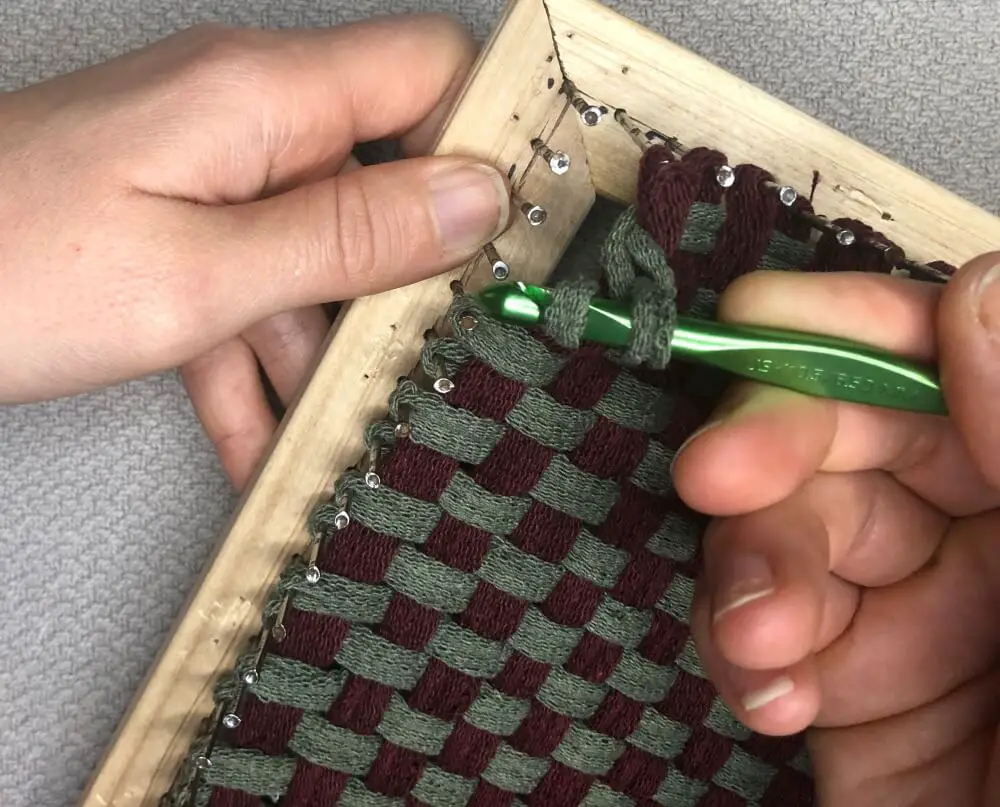
Slip the first loop over the second loop and off your crochet hook. This binds off your first loop.
Continue in this way all the way around your loom until you only have one loop left. To secure your last loop, you’re going to wind it around the loop it’s through one more time.
Take the last loop off your hook and hang onto it so it doesn’t unwind, then put your hook through the loop that’s already secure.
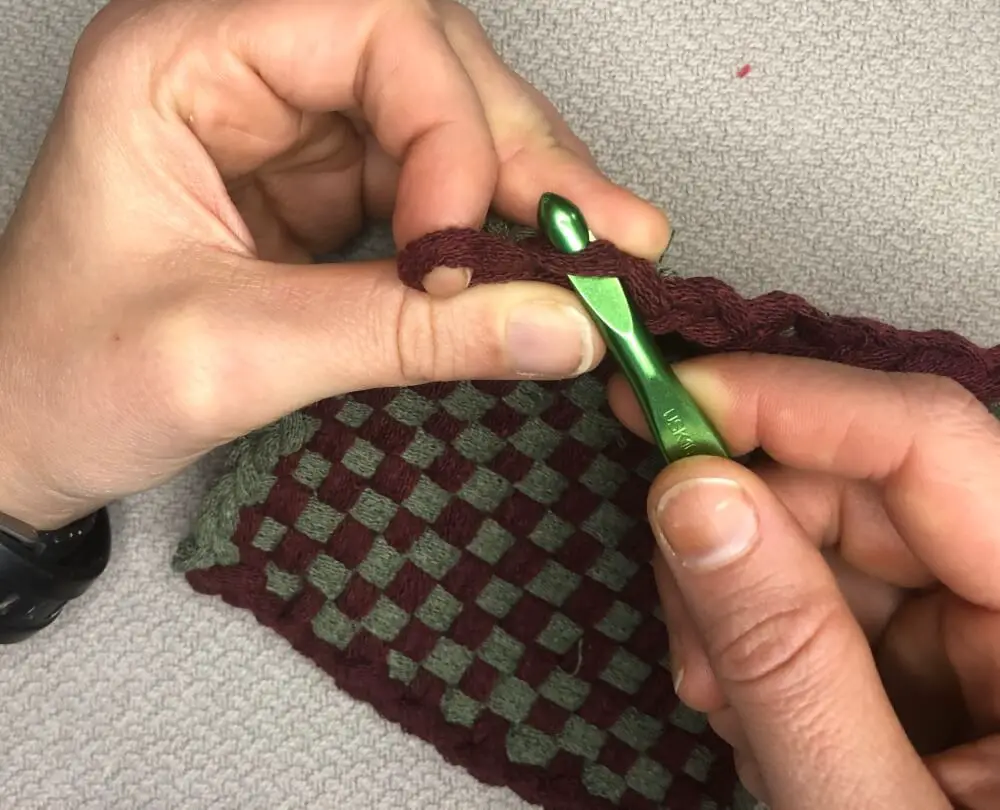
Then, hook the last loop from the other side and pull it through.
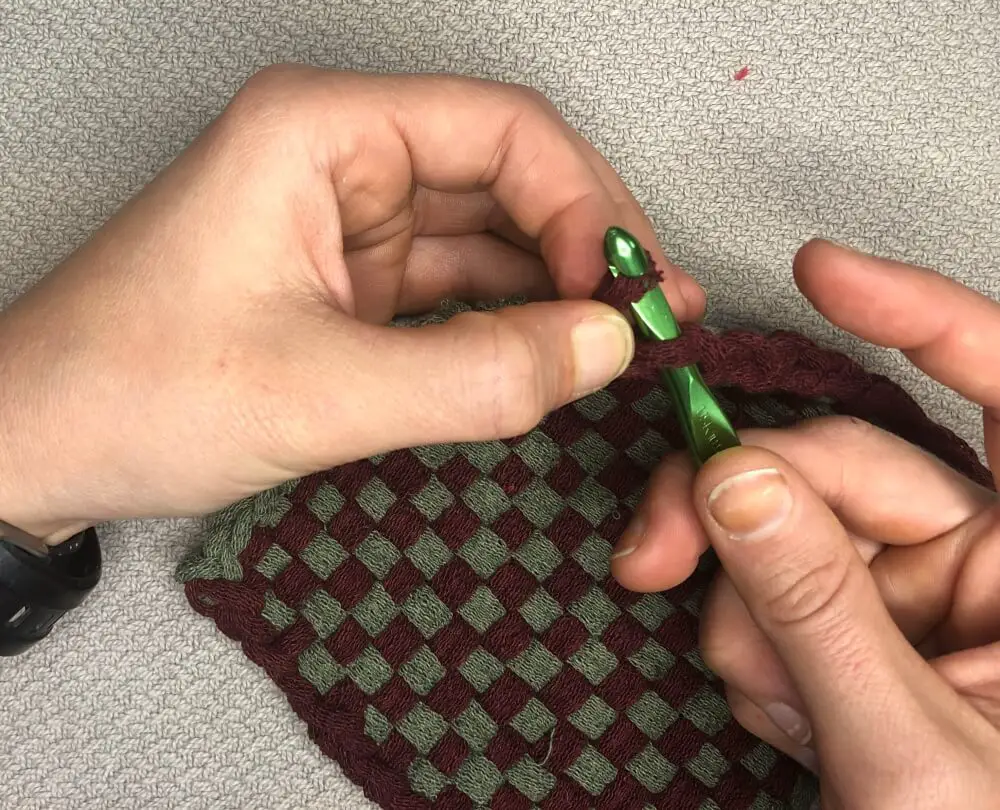
Now pull it tight. With your last loop secure your first potholder is done! The last thing you might want to do is even out the loops around the outside of your potholder.
Simply work your way around the potholder and pull the loops that are too tight. This will give your potholder an even outside edge.
T-Shirt Yarn
Since most t-shirt are made out of cotton, you can easily repurpose old t-shirts into yarn you can use to make potholders. It’s a great sustainable and useful way to reuse old clothing.
1. Gather Materials
Making your own t shirt yarn is pretty simple. Here’s a good video about how to repurpose old t shirts into yarn.
Now that you know how to make t-shirt yarn, here are the materials you need to make hotpads.
- Potholder loom (Friendly Loom, some loops included, see on Amazon)
- T-shirt yarn
- Crochet hook
- Tapestry needle or weaving hook
Let’s jump into repurposing old t-shirts into useful potholders.
2. Starting the Weave
To start the weave, tie a slip knot in your t-shirt yarn. Here’s how to tie a slip knot. Then, you’ll open your loop up and stretch it between two diagonal corner pegs.
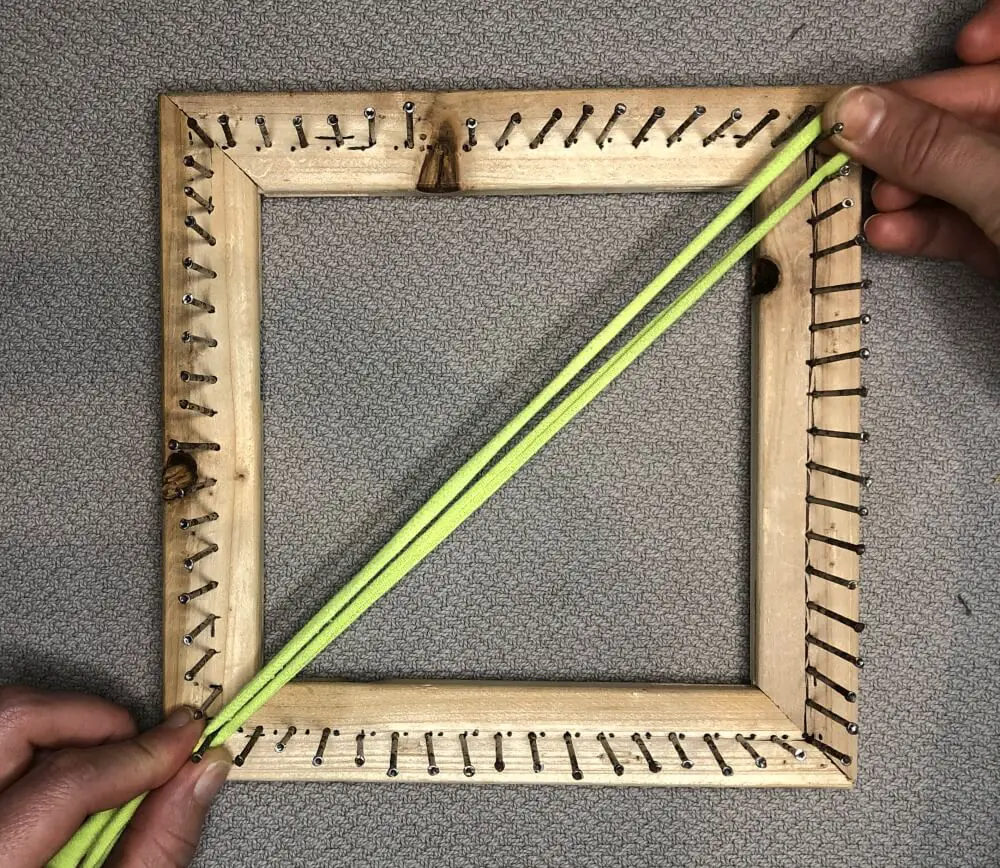
With your working end in the bottom left corner, loop the yarn over the next peg up and stretch it across to the corresponding peg in the opposite corner.
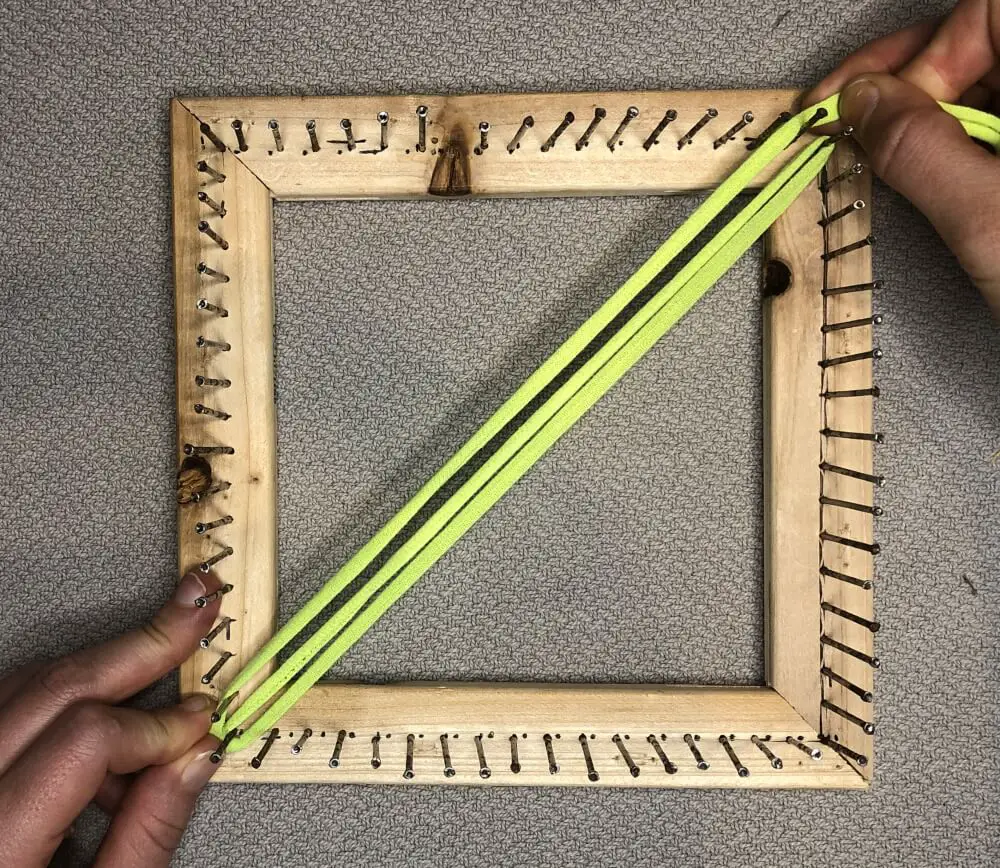
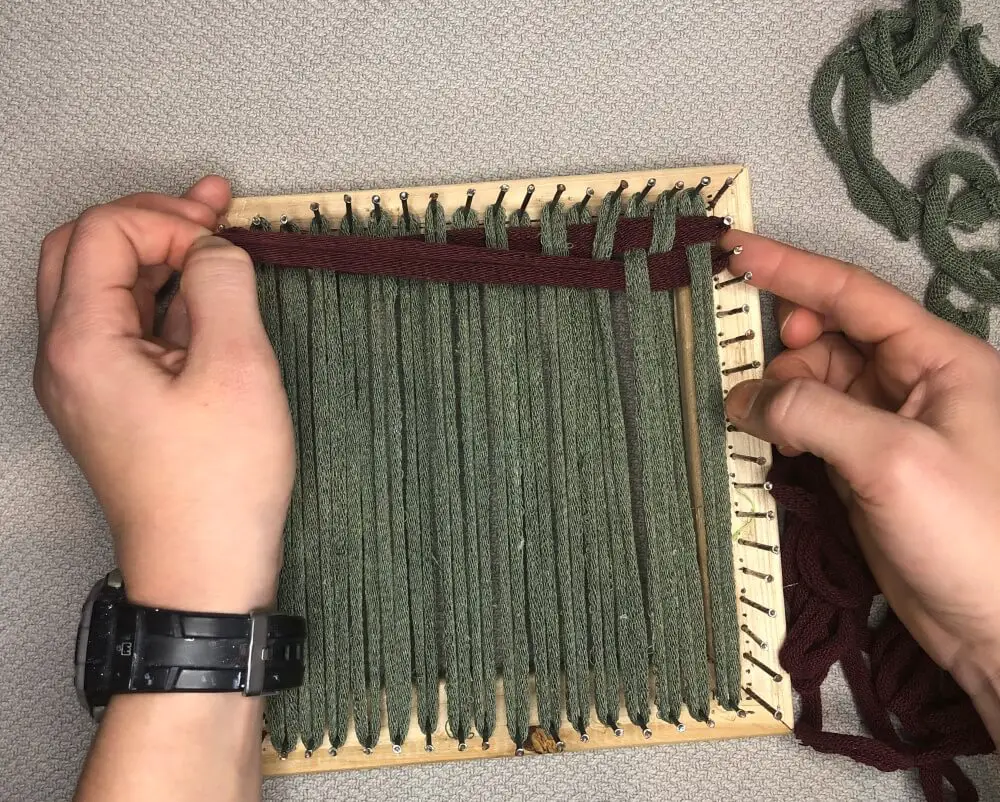
Take your crochet hook and work from right to left and go over then under the strands already there. Hook the t- shirt yarn, pull it across, and hook it to the next peg to the right of your starting corner peg.
Don’t pull your strand of yarn all the way through, leave the tail on the side you started on, this makes it so you weave both sides at the same time.
Pull the yarn down to the starting corner and loop the yarn around the peg next to the starting corner peg.

Now you’re back where you started.
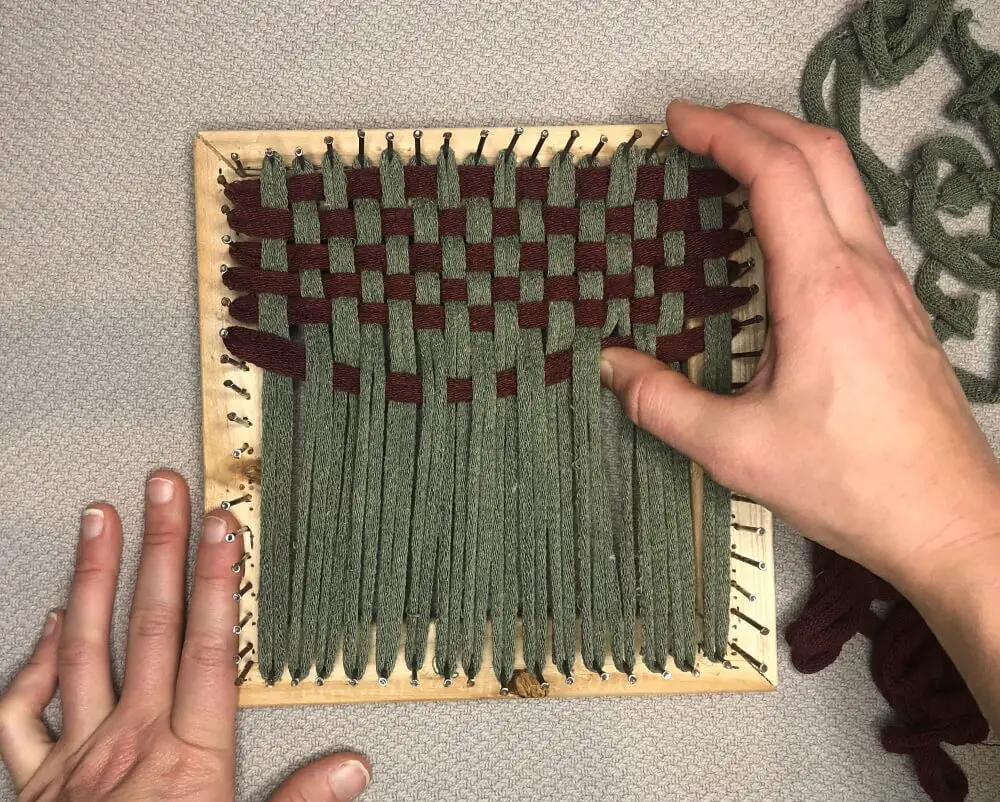
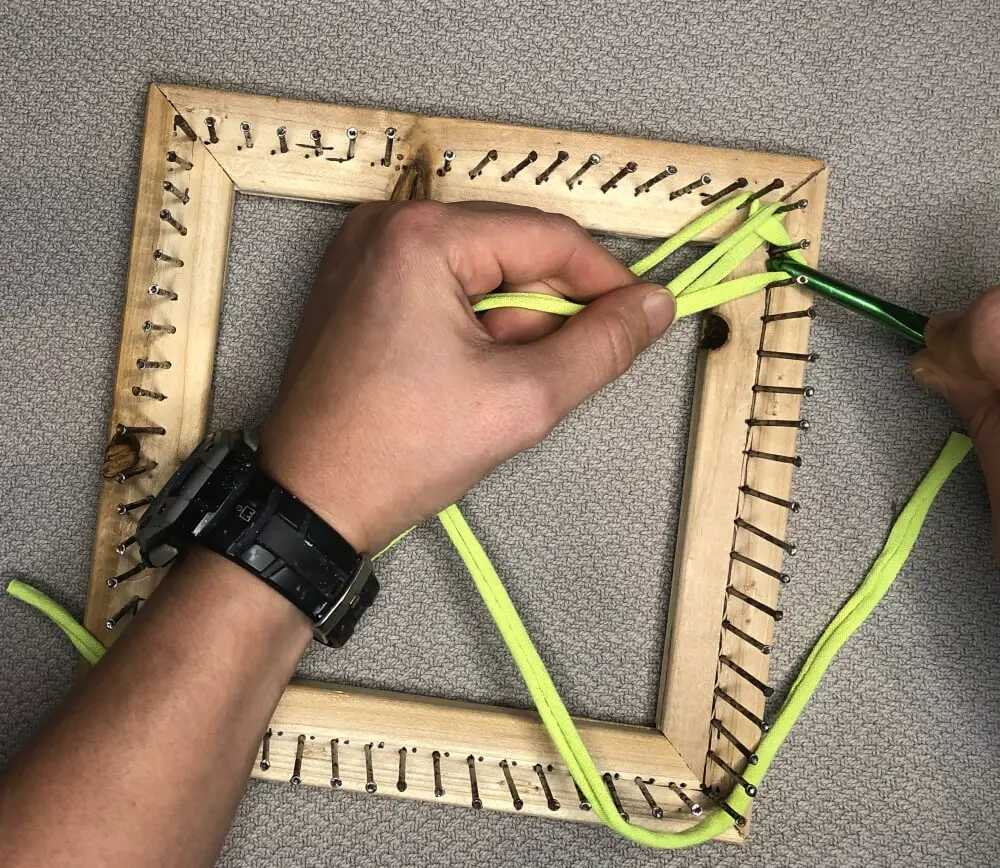
3. Continue the Weave
For the next row and all other rows, when you’re working your crochet hook across, you will always start by going over the first loop you come to.
This will ensure that you are doing the opposite as the previous row which is what makes the weave.
To continue the weave, you will keep going around in a square, hooking the next peg in the order until you’re ready to join a new color or it gets to the last few pegs.
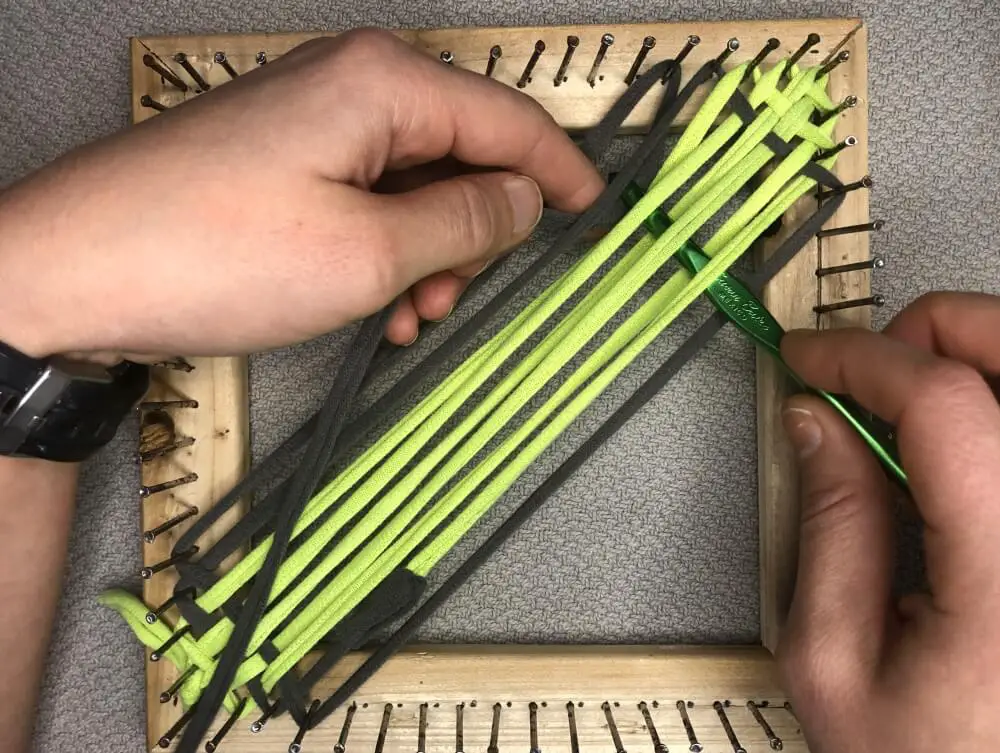
4. Joining a New Color
When working with t-shirt yarn, you can join new colors in whenever you want.
To join a new color, cut a length of your new color and hold the end of the new color together with the end of the old color.
Now fold the ends over so they are layered together with about an inch of excess. Make a small scissor cut in the two strands by cutting on the fold.
Put the end of the new color with the hole in it through the hole of the old color
Then, put the other end of your new color the hole in its other end, and pull it tight.
This creates a strong join that doesn’t require a knot.
You can change colors as many times as you’d like to create fun color patterns. Continue weaving until you get close to the last row.
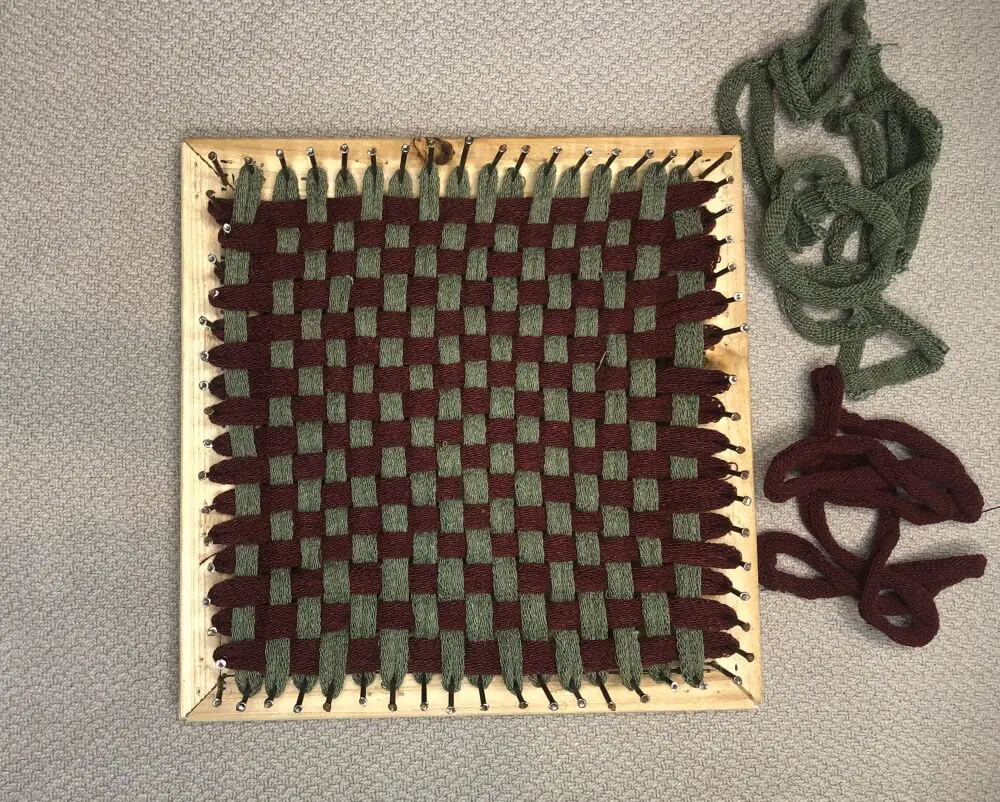
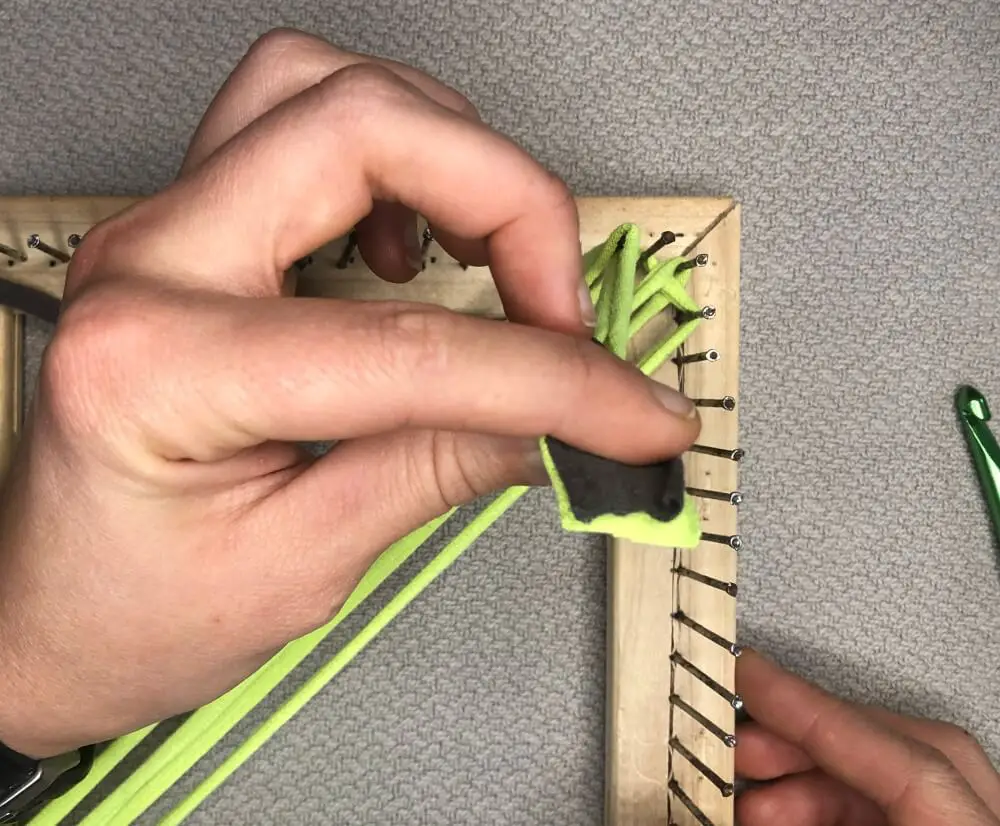
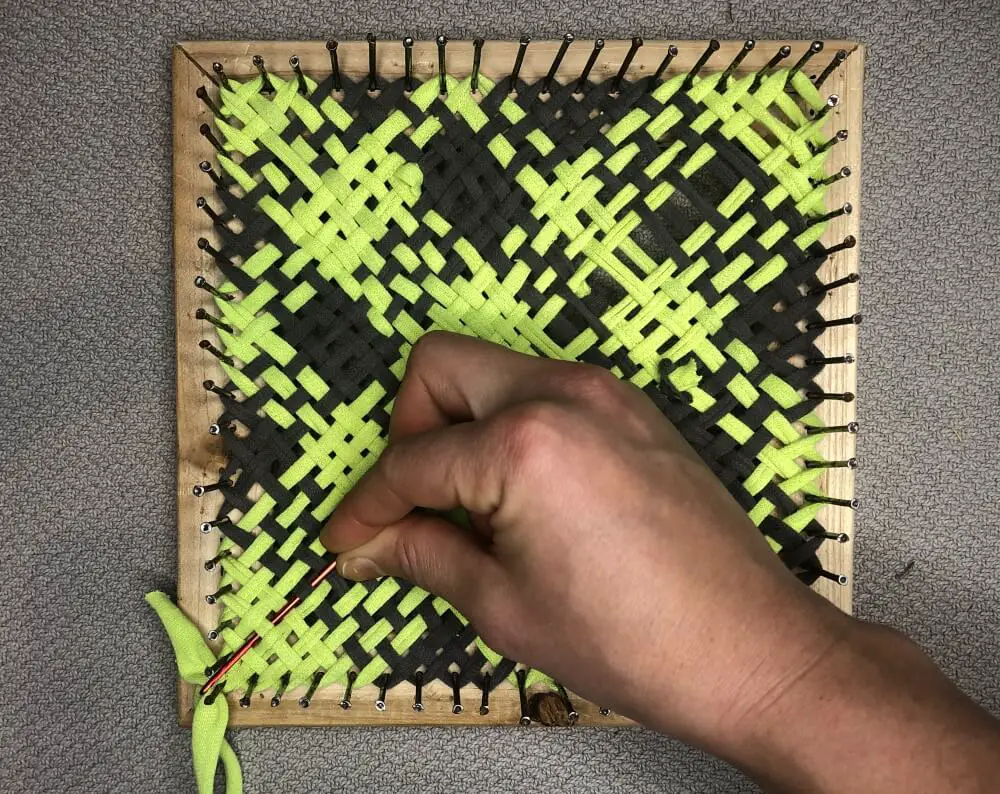
5. Weaving Last Row
The second to last row is where it starts to get difficult.
On your second to last pass, the weave will be getting long enough that you’ll have to pull the loop through in sections. Just make sure you’re always going over and under the opposite of the previous row.
Once you finish the second to last pass, you will need to separate the strands and push them up so there is space for the final row.
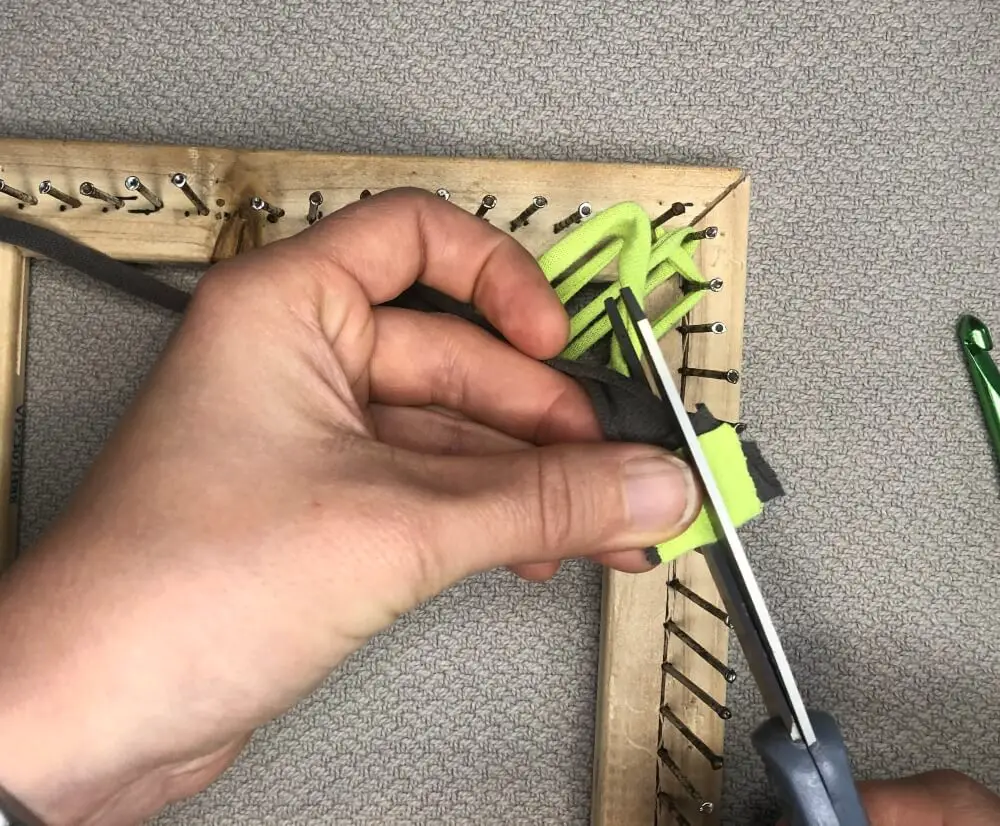
Once your loom is ready for the last row, cut your yarn long enough to make it to the opposite corner with a little bit of excess.
Loop the strand around the final corner peg and thread the end through a tapestry needle.
Using the needle, weave across the loops a few loops at a time. Go over under a few strands and pull your yarn through. Then make sure this final strand isn’t twisted.
Continue across the weave until you get to the opposite corner. Pull your yarn through and leave the tail hang.
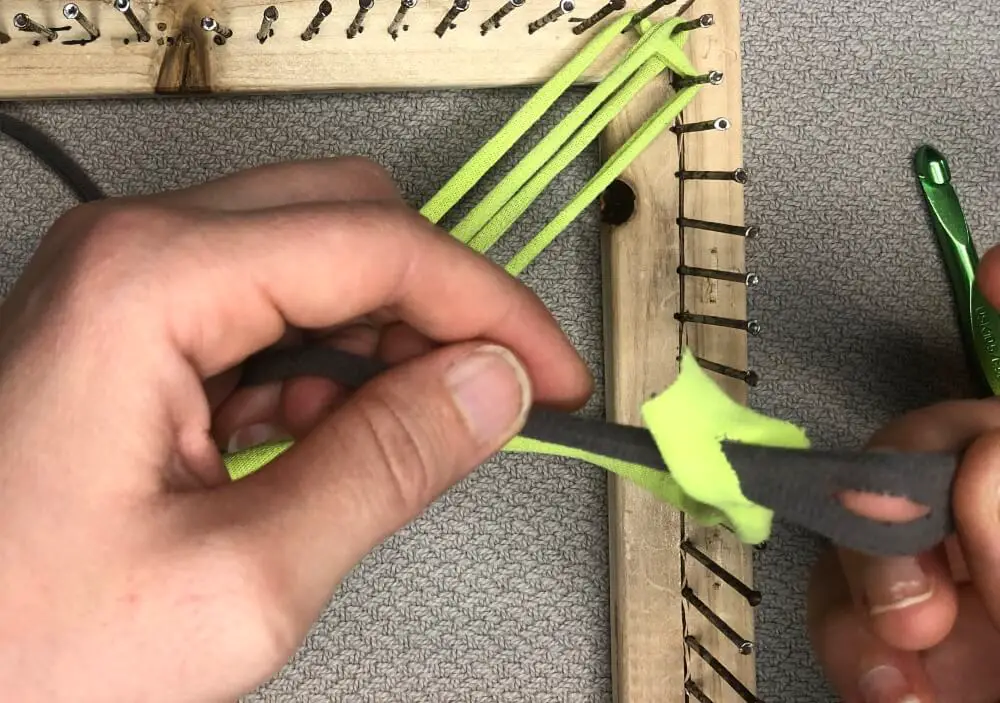
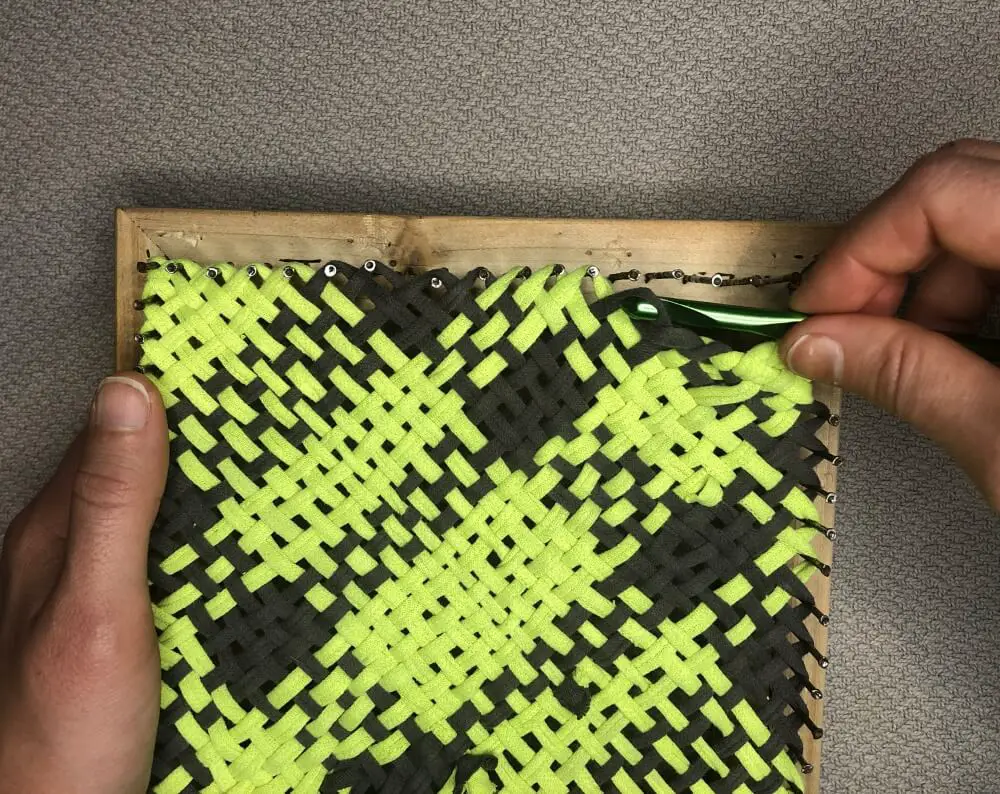
5. Finish Potholder
You’ve done all the hard work, now it’s time to do the finishing touches. You just need to weave in the ends and take it off the loom.
Put the end in the tapestry needle and weave it back under a few loops as if you’re weaving it in another row.
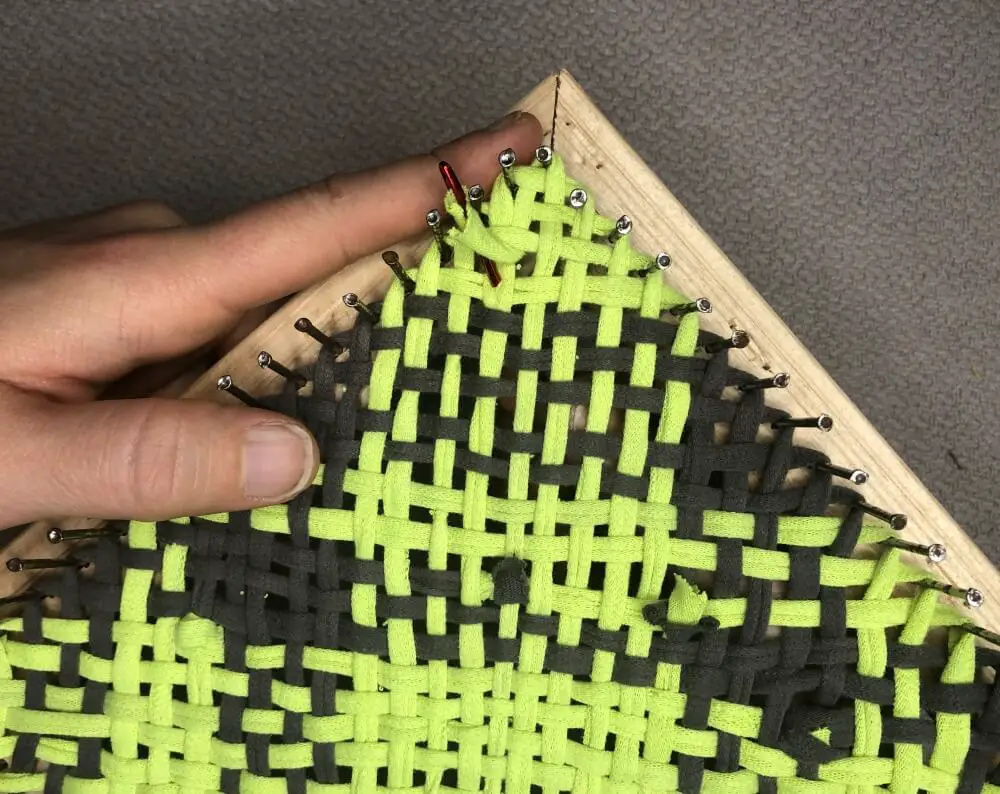
Then, work the needle through the middle of a strand of the t-shirt yarn. It will be a little difficult because of the way the t-shirt yarn is constructed.
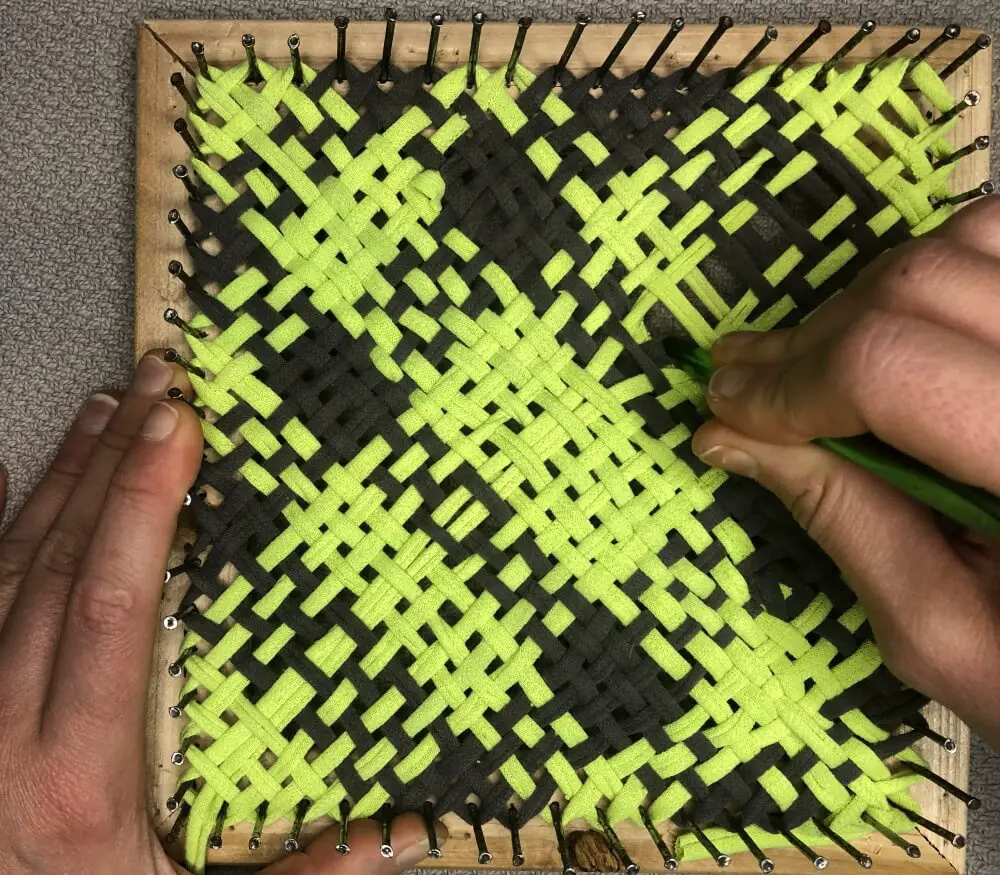
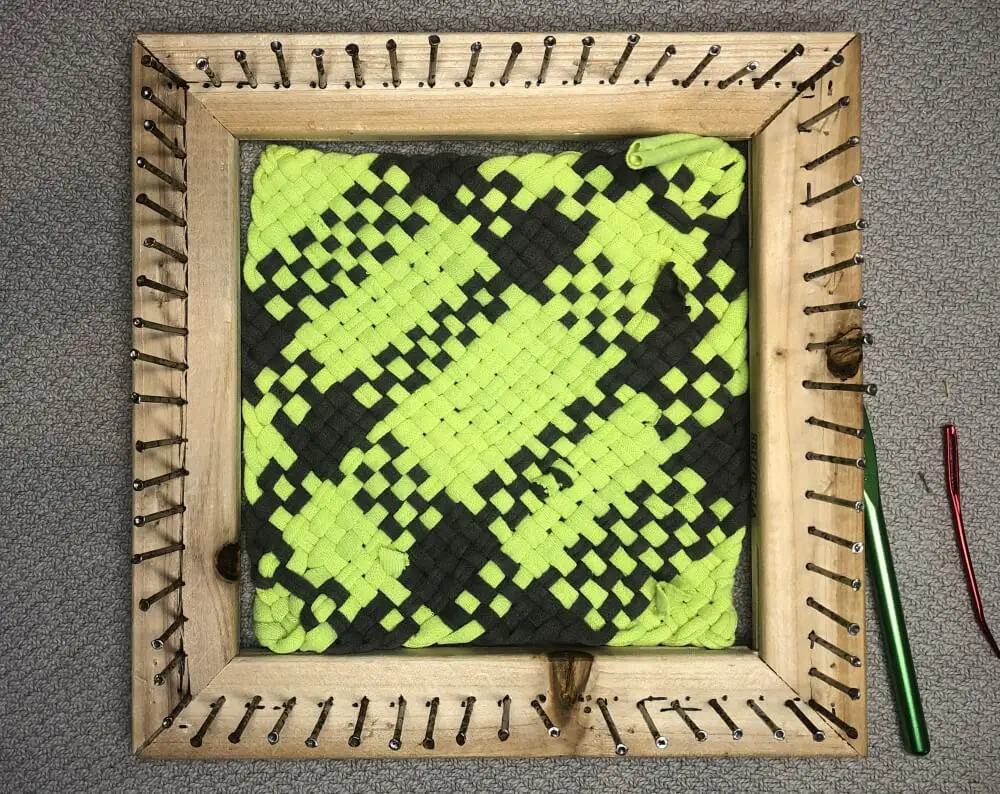
Now, remove it from the loom. Simply slip the loops over the pegs, the way that it’s woven ensures it won’t unravel.
And there you have it! Your very own potholder made out of upcycled t-shirt yarn. It’s thick durable and machine washable.
5 Fun Potholder Patterns
Now that you know how to use your potholder loom to weave a potholder, no one said functional potholders had to be ugly, so here are 5 fun patterns to make them useful and pretty.
These patterns will use the same color pattern on the warp and weft meaning the color pattern you use up and down will repeat going left to right.
These patterns focus on using cotton loops, but you can also try and replicate these patterns using the t-shirt yarn. Just have fun with color combinations!
My pin loom has sixteen pegs on each side which is a common size of pin loom, if you have a different size, you can still use these patterns but you will just have to increase or decrease the number of loops of each color that you use.
I’ll tell you how many loops of each color you need to make each pattern so you can make sure you have enough loops.
I definitely started making a pattern, got halfway through, and realized I didn’t have enough loops of one of the colors, don’t be like me.
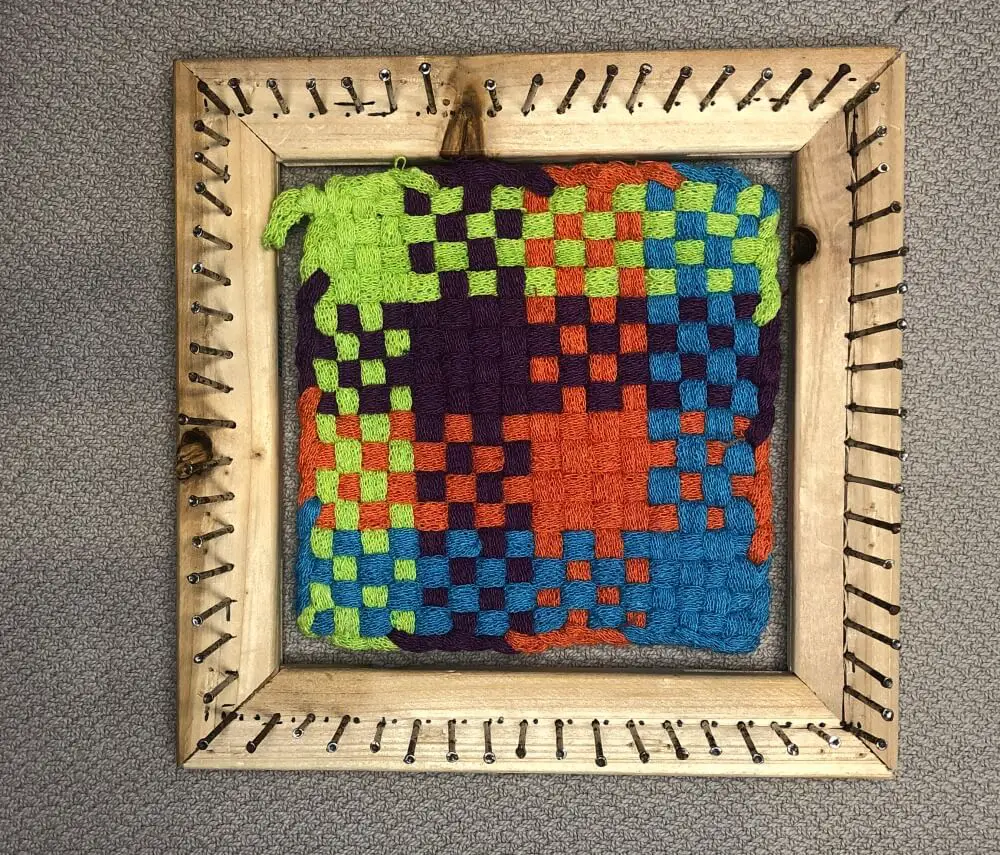
1. Color Blocks
For this pattern, you need 4 different colors and you need 8 loops of each color.
To make this pattern, have all four loops of your starting color together, then the loops of the next color, and so on. When you’re done your warp weave will look like this.
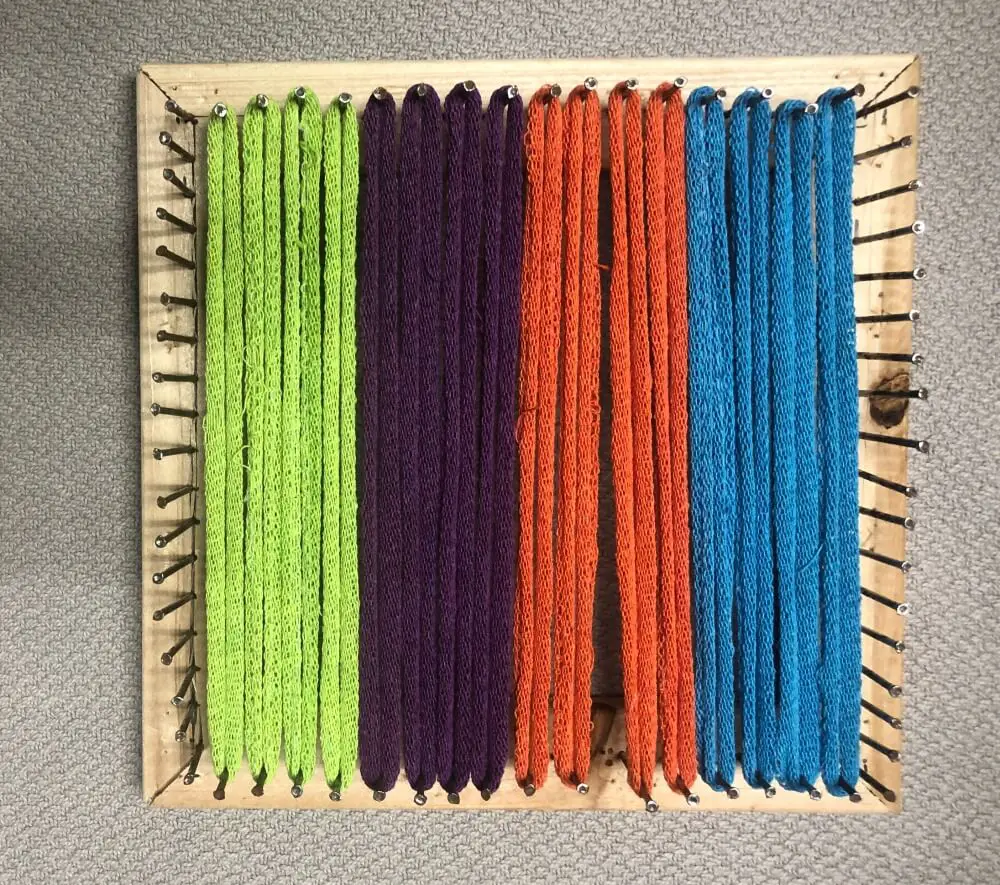
Now, repeat that pattern in your weft (across) making sure that you do the colors in the same order that they are in your warp (up and down)
My colors were in the order green, purple, orange, and blue. So, for my weaves across, I started with green then purple then orange then blue.
Here is what your finish potholder will look like.
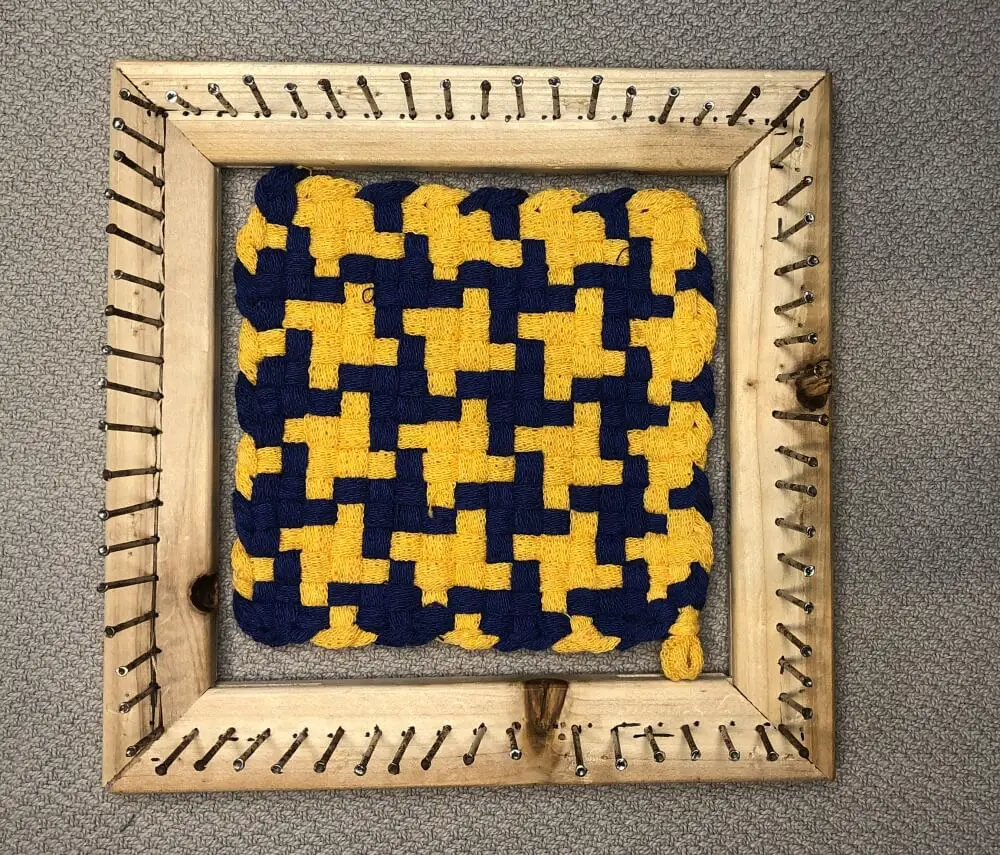
2. Houndstooth
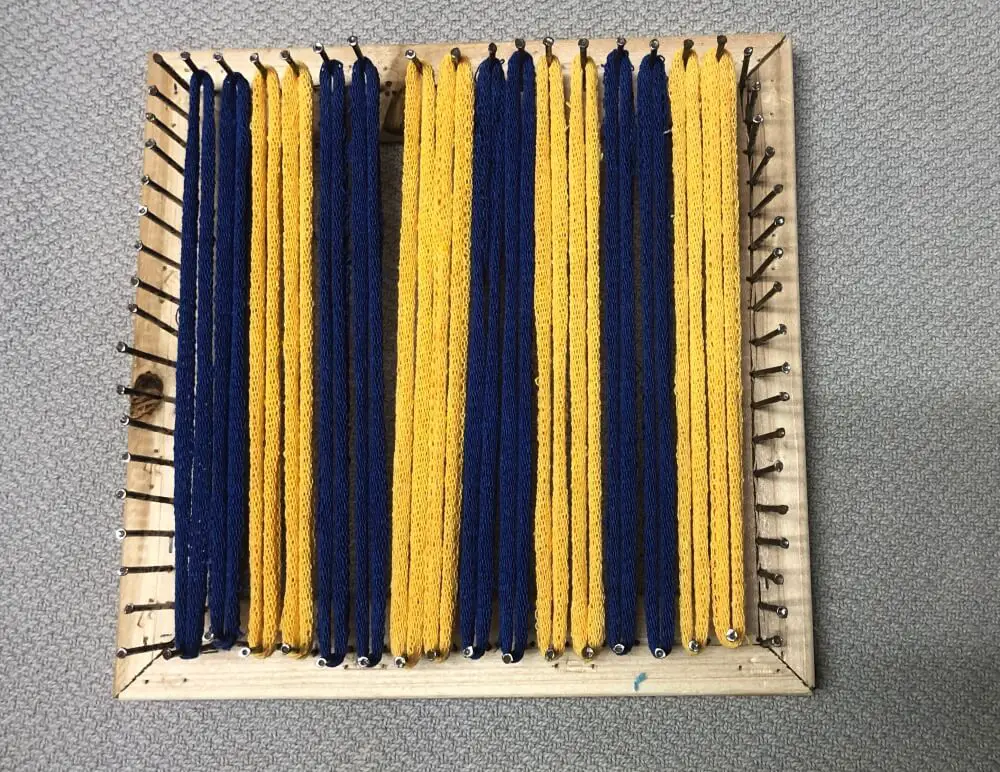
Houndstooth is a fun pattern that looks more complicated than it is. For this pattern, you will need two colors and sixteen loops of each color.
The pattern is made by alternating colors every two loops. So, you will do two loops of your first color, then two loops of your second color, and then back to two loops of your first color. It’ll look like this.
Then repeat this two and two pattern for your weave across, it doesn’t matter which color you start with. Your end pattern will look like this.
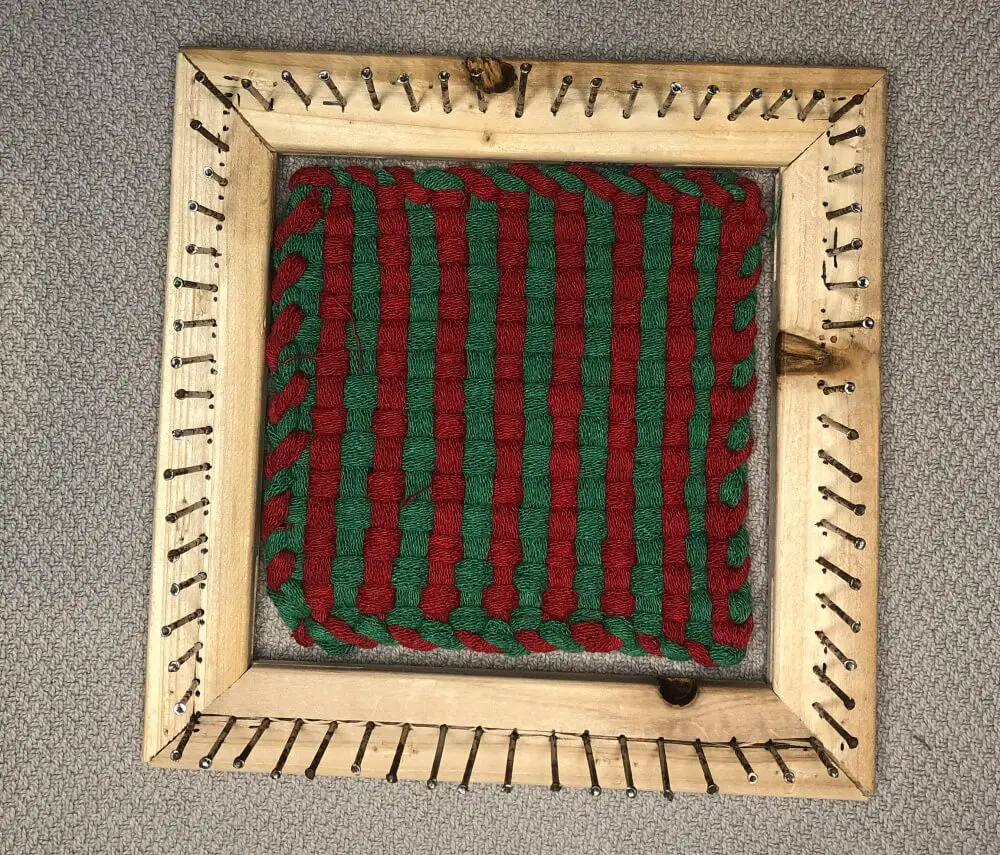
3. Stripes
To make stripes you will need two colors and sixteen loops of each color. I went with festive Christmas colors for this pattern.
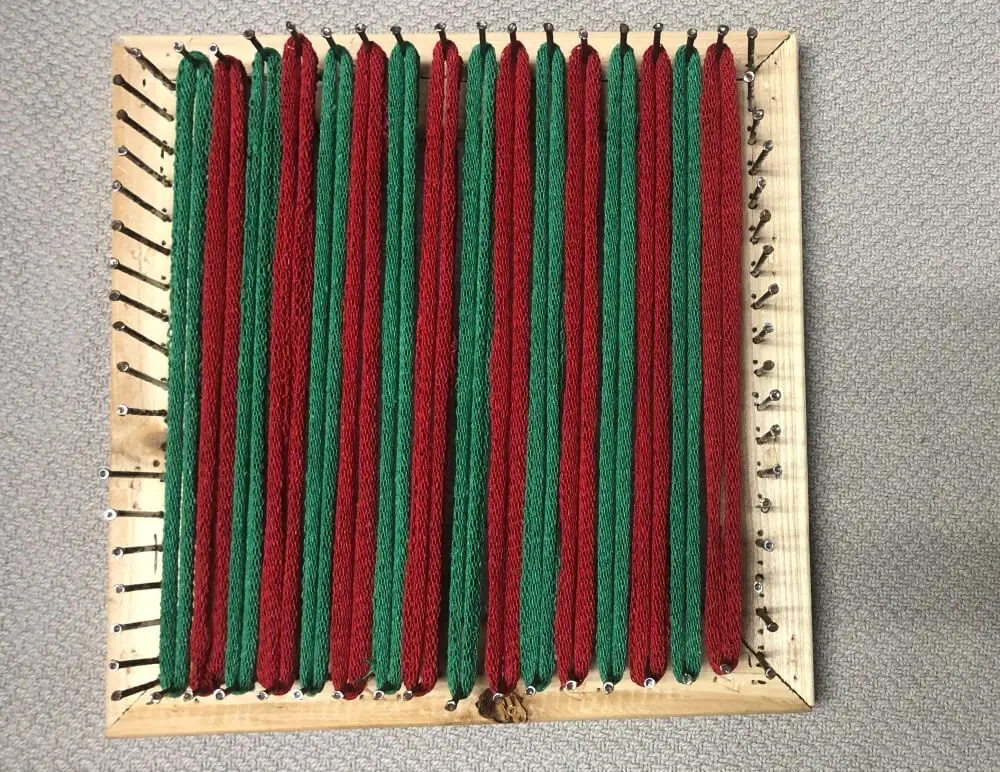
To make this pattern you will alternate your colors every other one, like this.
Then repeat this on the weave across, it doesn’t matter what color you start with. Here’s my finished potholder.
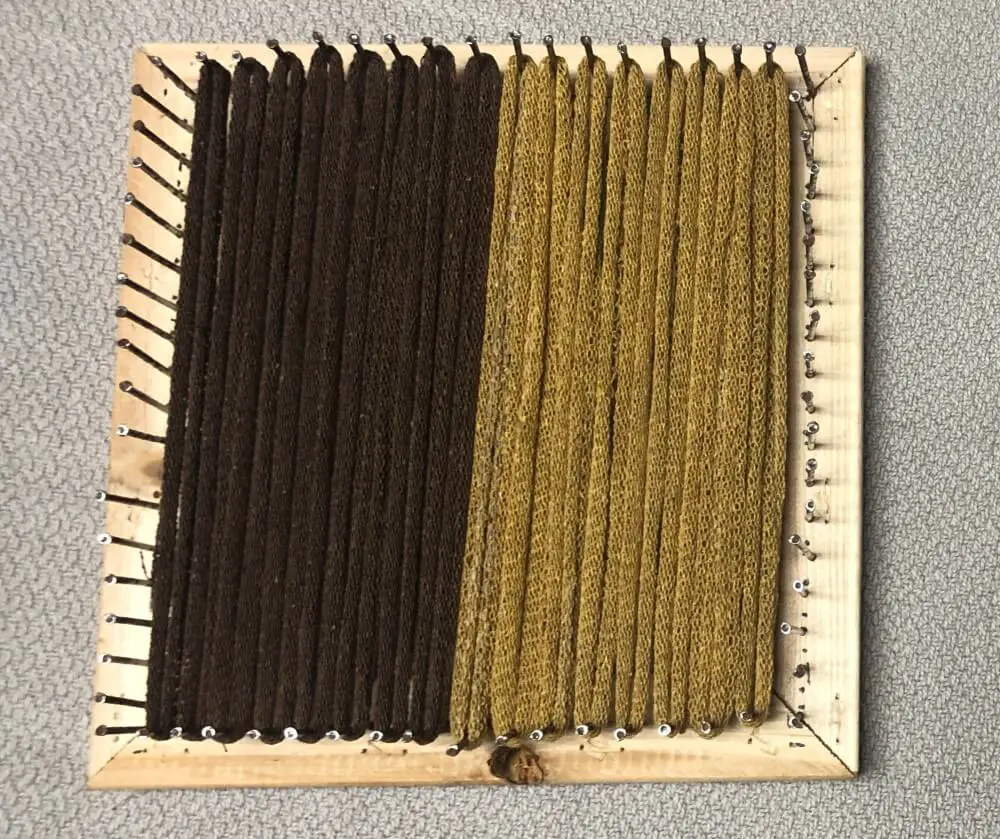
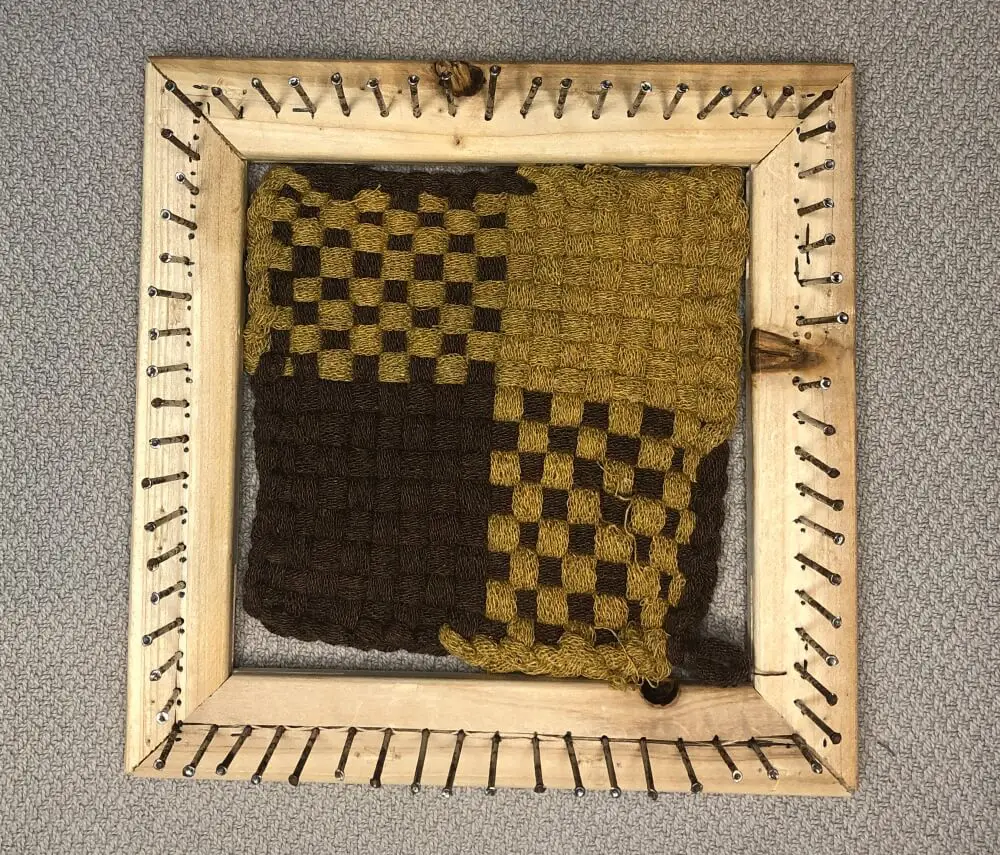
4. Half and Half
This pattern makes big color blocks in the corner of your potholder. You will need two colors, 16 loops of each color.
The first layer of this weave will be 8 loops of your first color and then 8 loops of your second color. It’ll look like this:
Then repeat the eight and eight going the other way to create the big blocks. Here’s the finished potholder.
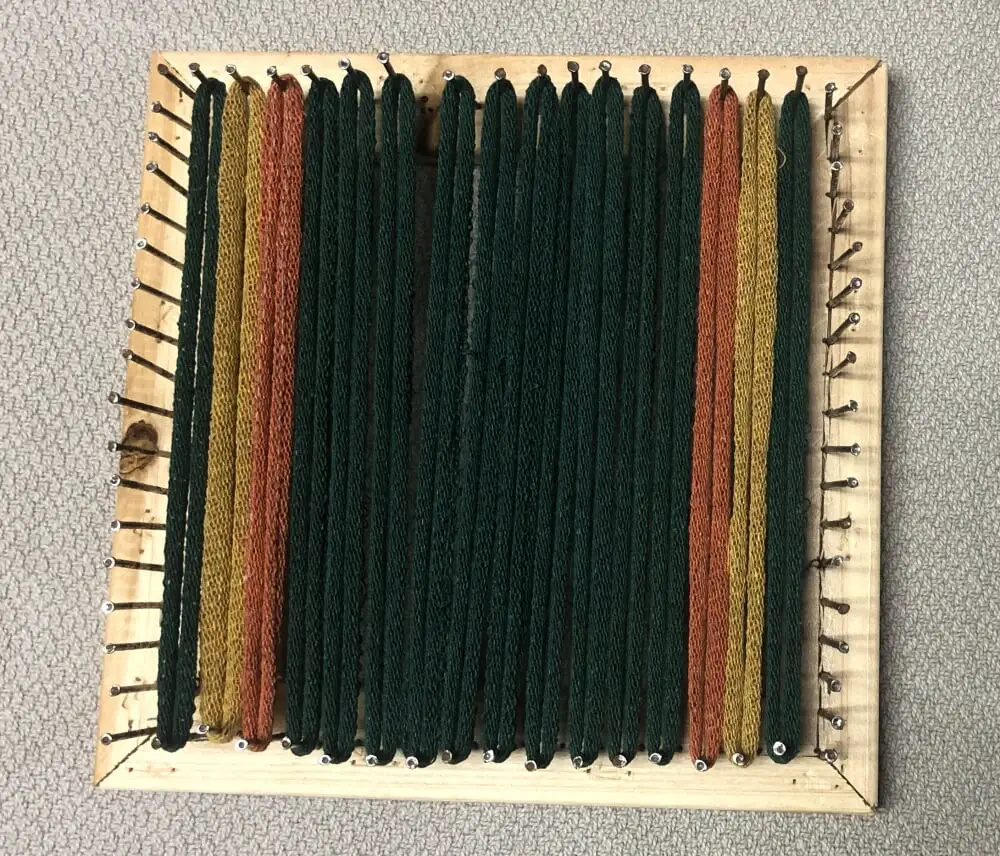
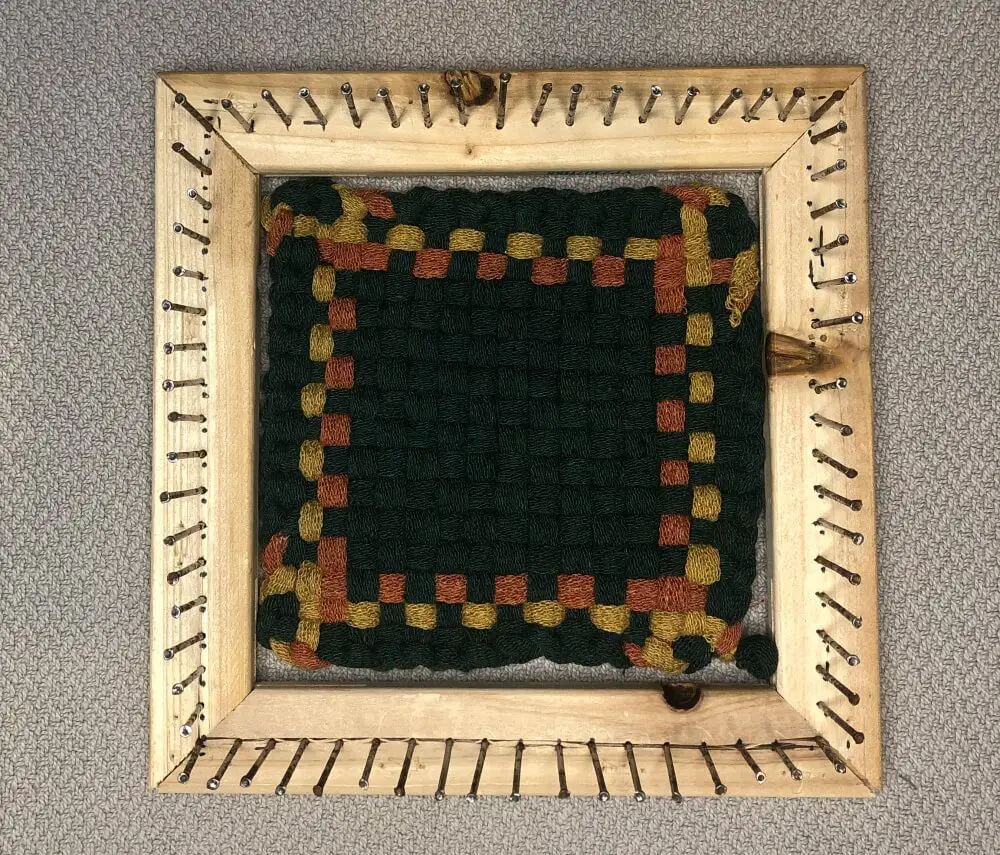
5. Corner Border
This is a nice pattern that’s good if you have a lot of loops of one color but it’s a little more complicated than all the other patterns.
You will need three colors. You will need 28 loops of your main color and four loops of each of your other colors.
The pattern will go one loop main color, one loop first contrasting color, one loop second contrasting color, 12 loops main color, one loop second contrasting color, one loop first contrasting color, and one loop main color.
I used green, yellow, and orange so here is the pattern using my colors: 1 loop green, 1 loop yellow, 1 loop orange, 12 loops green, 1 loop orange, 1 loop yellow, 1 loop green.
This is what my first layer looks like.
Then, repeat this color order across the other way.
The easiest way this pattern can get messed up is you mix up the order of your two contrasting colors, keep a close eye on your colors when you get to the second half of the weave.
Here’s what the finished pattern will look like.
")