Did you ever make those potholders with the loops when you were a kid? Because I certainly did. Now as an adult, I’ve realized all the things you can make with a pin loom. So, I decided to make my own pin loom, here’s how to make a pin loom:
Pick out a frame for your pin loom, then measure out and mark where each pin will go. The pins should be spaced 1cm apart. Then, use picture-hanging nails and hammer your “pin” into each spot that you marked. Try to make sure the nails are straight.
That’s all there is to it. It’s a pretty simple loom to make but there are still a lot of little details. In the rest of this post, I’ll show you step-by-step how to make a pin loom with pictures to go along with each step.
Let’s get started!
Disclaimer: This post contains affiliate links. This means I may earn a commission should you choose to make a purchase using my link
Table of Contents
What is a Pin Loom?
Pin looms are little looms that are used to create pin loom squares as well as other objects that are already square like potholders and washcloths.
You can then combine the small squares to make something much larger such as a scarf or a blanket.
These looms can be a variety of sizes and even different shapes, but they original functionality of the pin loom was to make small quares. Their small size makes them perfect for portable weaving or weaving when you have confined space.
If you’re interested in pin looms but aren’t confident in your abilities to make your own, that’s alright, alot of craft stores will sell potholder looms which are the same a pin loom except they’re usually made out of plastic.
Also, the Schacht Spindle Company makes a square Zoom Loom that you can buy and to make pin loom squares although the way you weave on them is slightly different than on a traditional pin loom.
If you’re interested in buying a Zoom Loom instead of making your own pin loom, you can get one on the Woolery (<– Affiliate link over there!)
Now let’s get into the action.
How to Make a Pin Loom
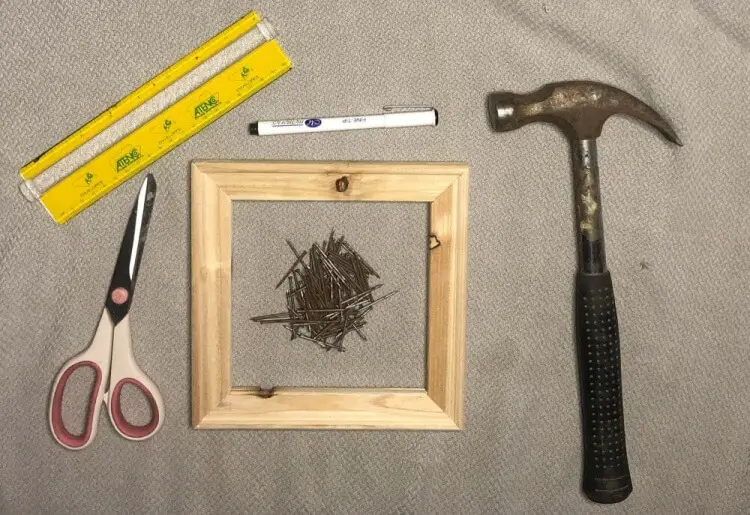
Before we jump into making a pin loom, here’s a list of the materials you’ll need to gather to make your own loom:
- Wooden Frame
- Ruler
- Pencil or pen
- Hammer
- Finish nails (these are your pins)
- Sandpaper (optional)
We’ll talk about the frame in the next section but before we get there I want to give a quick word about the kind of nails you get.
You should look for finish nails or brad nails. They should be at least 1 inch long and you don’t want the top to have to have the typical nail top. You want the top to be rounded or else it could catch on the yarn and make it difficult to get your finished square off.
If you don’t want to worry about choosing the right nails, here’s a link to the type of nails I’m talking about (affiliate link incoming!): Finish nails.
Now, let’s get into the real reason you came here; how to make a pin loom. First up, choose your frame.
1. Choose a Frame
Here’s a list of all the things you could use to create the frame for your pin loom:
There are many things that can be used or repurposed into a frame for a pin loom. Here are some pin loom possibilities but if you have something that’s square and wood, you can use it make a pin loom.
- Wooden picture frame
- Canvas square (with canvas removed)
- Old canvas artwork (with canvas removed)
- Make your own frame
For my pin loom, I bought a canvas art frame and removed the canvas and staples. I have a friend who paints that I’ll give the canvas to so I don’t feel bad about using a new canvas frame.
Here’s what my wooden frame looks like:
Regardless of which thing you choose to use, you want to make sure that your pin loom is square and it’s made of wood.
To make sure it’s square, measure all four sides of your frame, if the sides are all the same length then you’re good to move on to step two.
2. Prepare Frame
Some frames will require more prep work than others.
For a wooden picture frame, you’ll need to remove the glass, the backing, and any fixtures on the sides or back of the frame.
For using an art canvas, remove the canvas and any staples that were used to attach the canvas like I did.
In order to make it nice to hold, you’ll want to check the outside edges of your frame to make sure there are no rough edges that could cut you or give you splinters.
If there are, use a piece of sandpaper to smooth out the edges in question.
Last but not least, this is also your opportunity to decorate your frame. You can paint it, put on stickers, write a message, or anything else you can think of.
Once you put the pins on, it won’t be easy to put any decoration on your loom.
Now that your frame is all ready to go, let’s get into the next step.
3. Mark Pin Positions
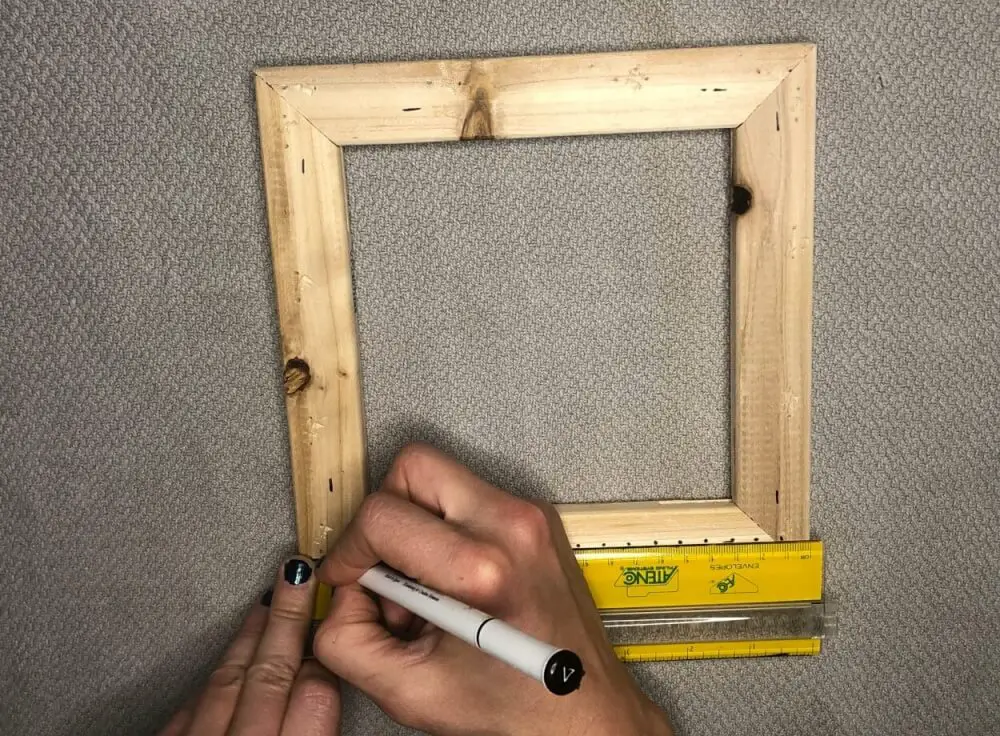
This is one of the most important steps. If you’re someone who jumps in without planning, please please do this step before you start putting your pins in. You can thank me later.
Get out your hand dandy ruler, and mark a spot every 1cm on your frame. You’ll want to put your marks in a straight line in the middle of your frame like this:
If you put your pins right along the outside, you won’t have any space to hold onto the frame while you’re using it.
This step can be time-consuming but it’s worth it.
4. Attach Pins
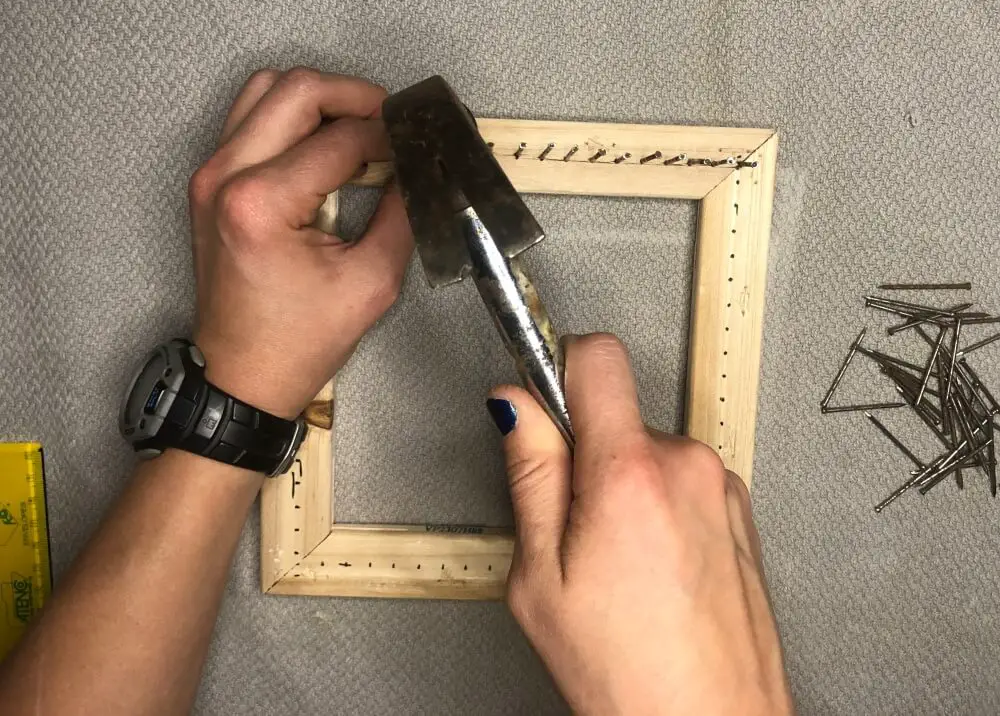
Now, time to put the pins on and turn this frame into a pin loom!
Take your nails and your hammer and put a nail on every dot you marked in the previous step. You want to leave at least 1/2 an inch of nail above the frame so you have enough room to put your yarn on.
You also want to make your pins as straight as possible.
If you’re having trouble holding the pins in position because they’re too close together, or you’re worried about hammering your fingers, you can use a pair of pliers to hold the nail in place for you like this:
Continue around your loom until you have a nail in every spot you marked. Once you’re done, your frame loom should look something like this:
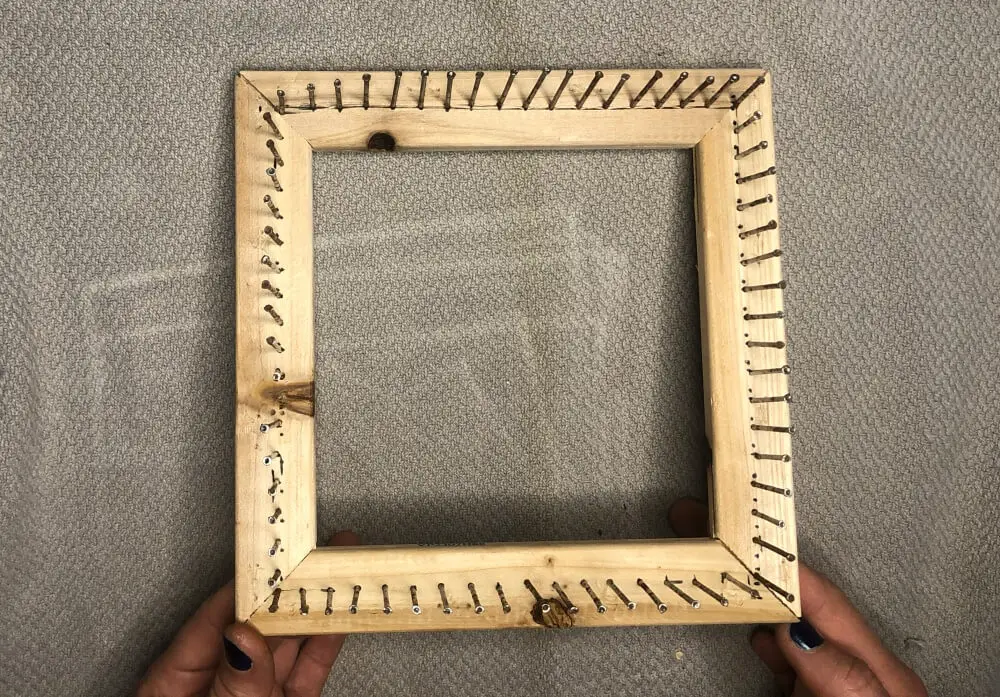
Boom! Give yourself a round of applause!
Now that you’ve got your very own pin loom, let’s learn how to use it to make pin-loom squares; the basis of all pin loom projects.
How to Make Pin Loom Squares
For this tutorial, I’m just going to show you how to use a pin loom to make a plain weave square. But, once you get the hang of it, you can use different techniques to create some pretty cool patterns.
If you want to see the different pin loom patterns that are out there, the Adventures in Pin Loom Weaving has a great archive of pin loom square patterns.
1. Gather Materials
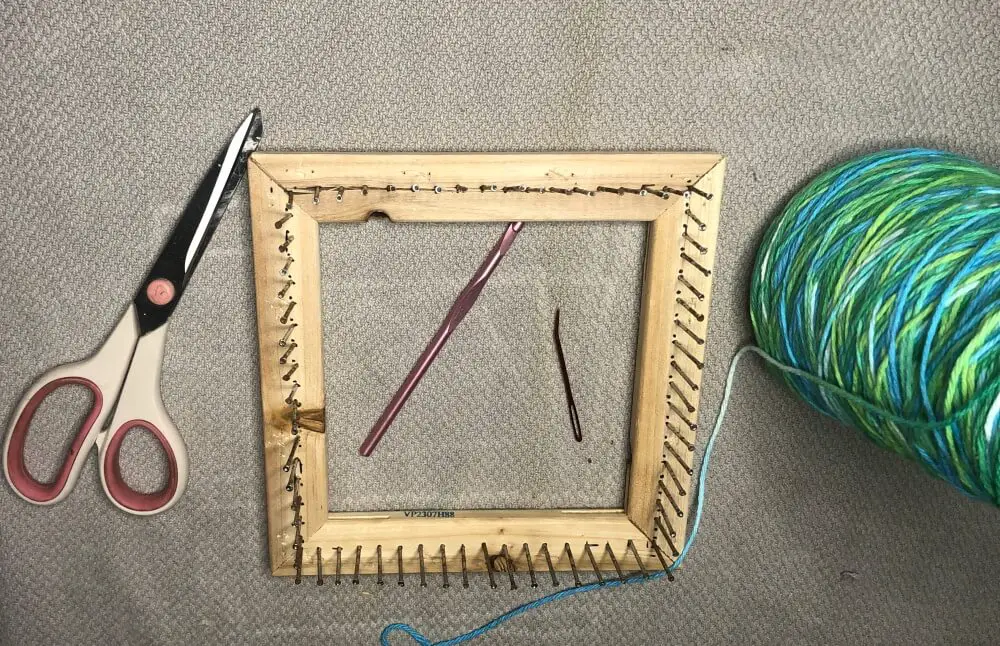
Here are the things you’ll need to gather before you get started with making pin loom squares:
- Pin loom
- worsted weight Yarn
- Scissors
- Crochet Hook
- Tapestry needle
I’m going to be using thick cotton yarn for this pattern so I can use this square as a washcloth when I’m done.
To make sure you have enough yarn, you can weave directly off the ball of yarn, but you should need approximately 5 yards of yarn for this project but it will depend on your exact size of loom.
Instead of a crochet hook, you can also use a weaving hook which is basically just a super long crochet hook. But, crochet hooks are easy to find and I already had one so that’s what I’ll be using.
Lastly, instead of a tapestry needle, you can instead use a weaving needle which is just a super long needle with a big eye.
Now that you’ve got your materials ready, let’s get into the fun part: weaving!
2. Weave Your Pattern
Pin looms are unique in that you weave the warp (the string that goes top to bottom) and the weft (string that goes side to side) at the same time.
This makes it a great craft for kids or for someone who wants to get started with weaving but is intimidated by warping a loom.
One thing of note before we start, there are two different ways to weave on a pin loom. One is to weave diagonally starting at a corner which is the method I will be demonstrating.
The other method is to weave layers of yarn on top of one another and then go back and secure it with a weft thread. If you’re interested in trying this method, check out this tutorial on Mielkes Fiber Arts.
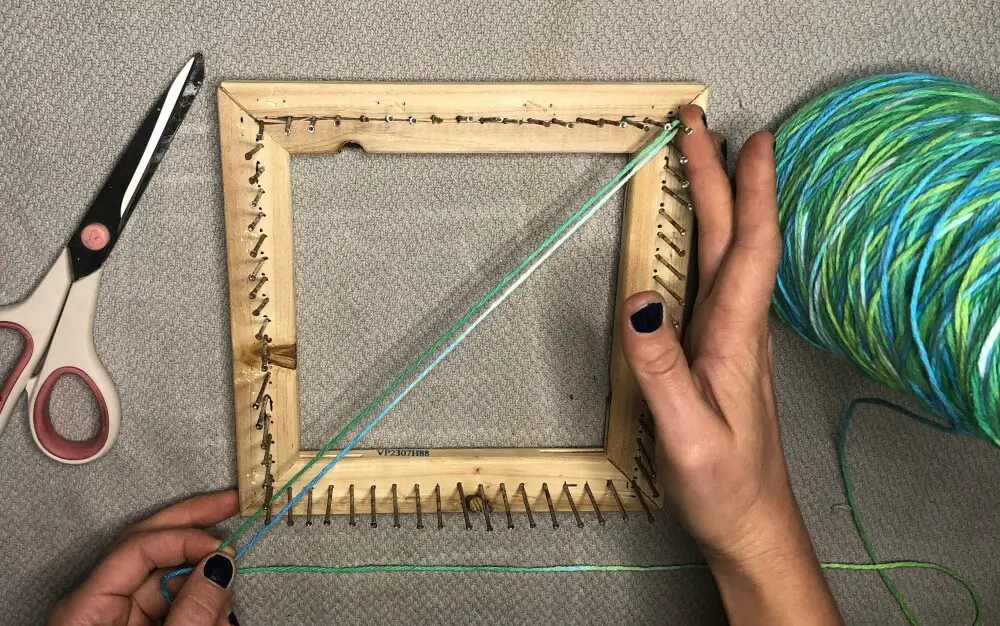
The First Loop
For a plain weave pattern, you’re going to take your yarn and tie a slip not in the end. Here’s how you tie a slip knot.
Then you’re going to make your slip knot loop really big and stretch it from one corner pin to the opposite corner pin like this:
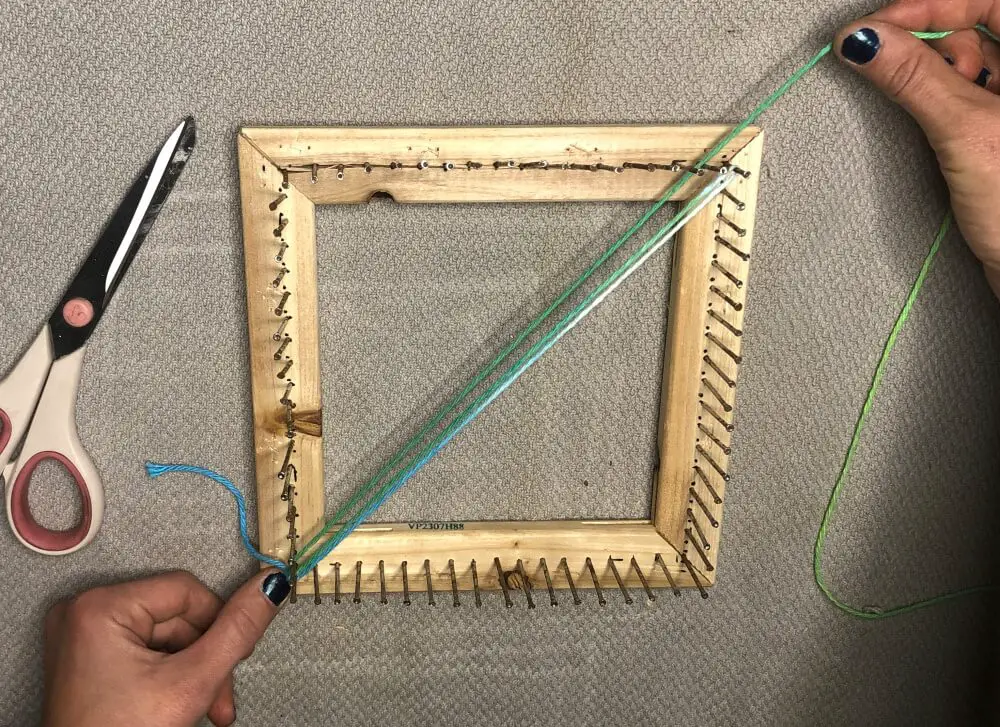
Continuing the Weave
Now, starting at the corner that has your slip knot in it, you’re going to take your working yarn and loop it under the first pin to the left of your starting pin.
Then, take your thread up to the opposite corner and loop it over the pin to the left of your first loop.
Take your crochet hook and, going from right to left, go over and then under the threads from the first loop.
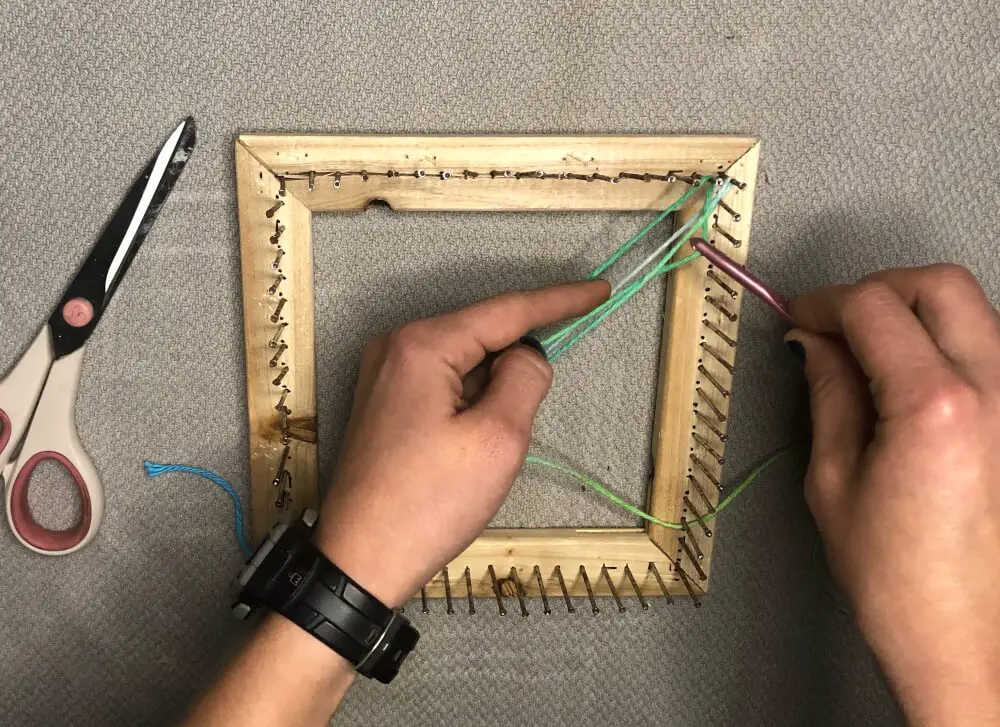
Tip: as you keep weaving, you will always go over the first thread from right to left.
Hook your working thread with your crochet hook and pull it through to the other side and loop it onto the pin directly to the right of your first loop.
Bring your working thread down to the starting corner and loop it over the hook directly to the right of the slip knot.
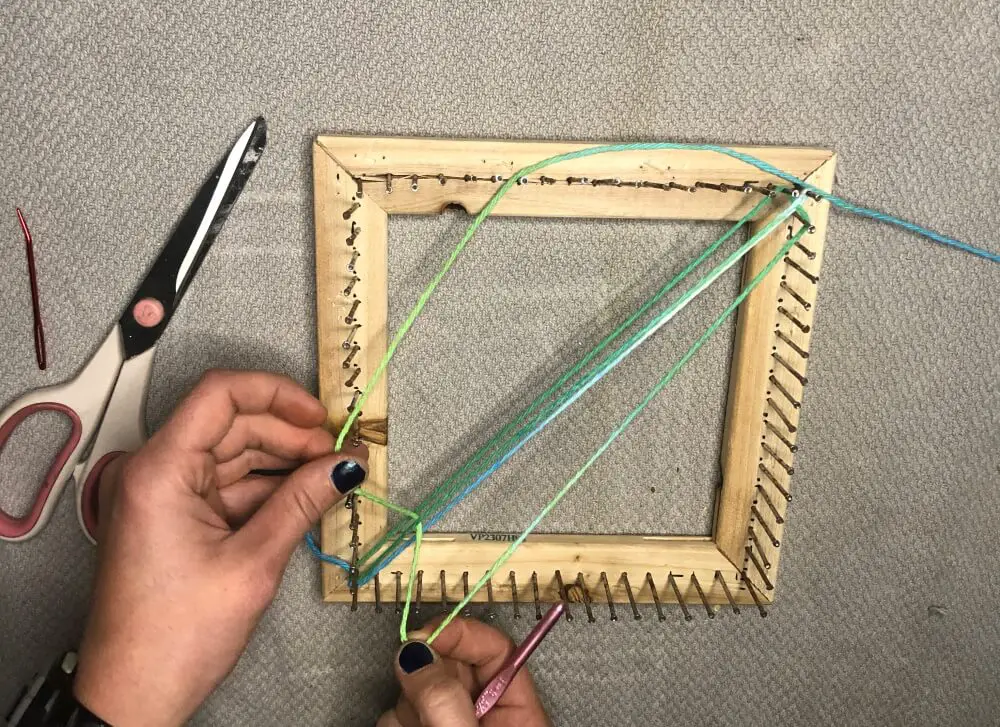
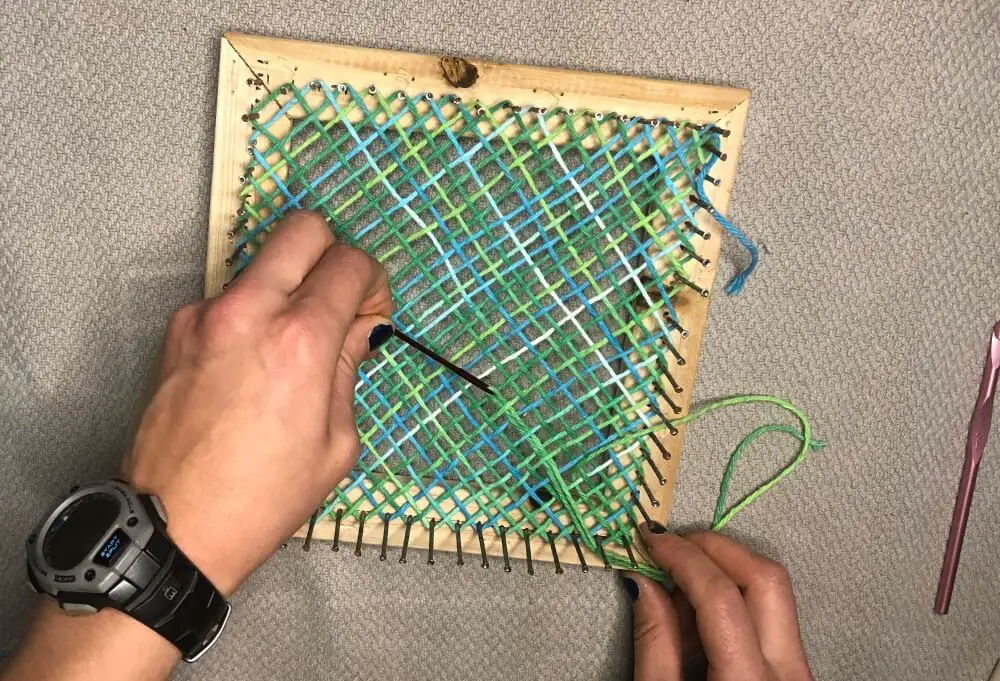
And you are successfully weaving!! To make your square, continue weaving in this way until you only have a few pins left.
It will get more difficult to do the over unders as your weaving gets larger, you might have to start doing them in segments instead of all at once.
What I mean by this is you’ll do a few over unders until you run out of room on your crochet hook and then pull the loop through, then go through a few more and leap frog the loop through until it gets to the other side.
If you ever get lost in which thread you should go over, look at the previous thread above your current row and do the opposite. So, if you went over the thread in question on the previous row, the next row you go under it.
As your loops get more difficult, It’s important to make sure you don’t twist your loop together so you keep the threads straight and continue the pattern of the weave.
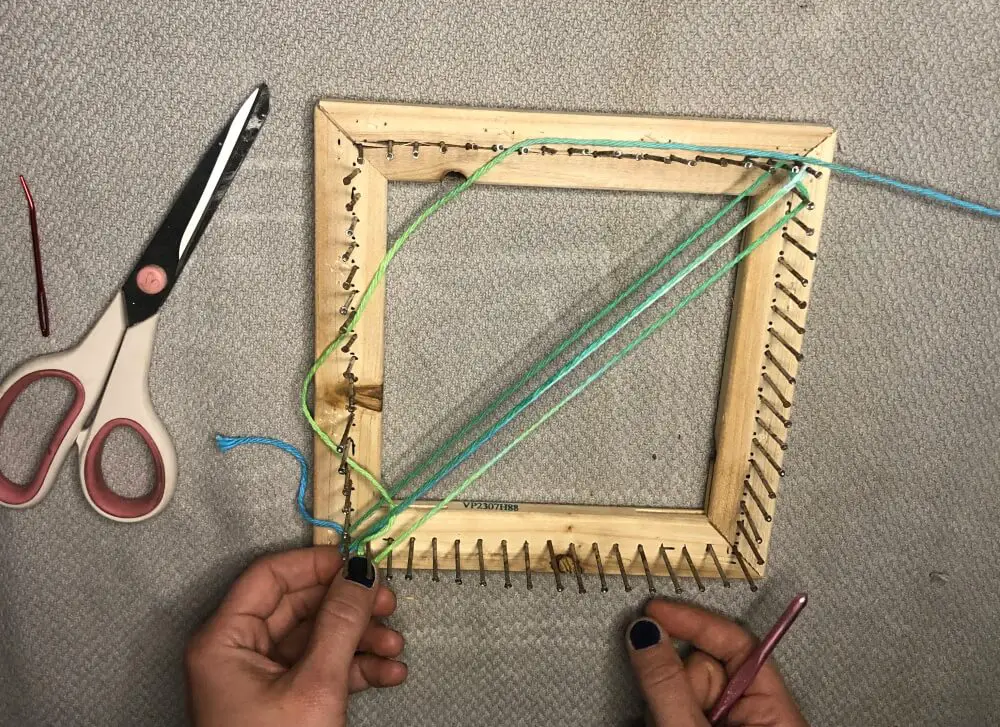
The Final Loop
Once you get to the point that you only have the other two corner pins left, it’s time to do the final loop (cue the Final Countdown by Europe).
For the final loop, you’re going to cut your yarn leaving a long tail, at least a few inches longer than the length across your loom.
Then, take your tapestry needle (or any kind of needle with a big eye), and weave your length of yarn over under to the opposite corner.
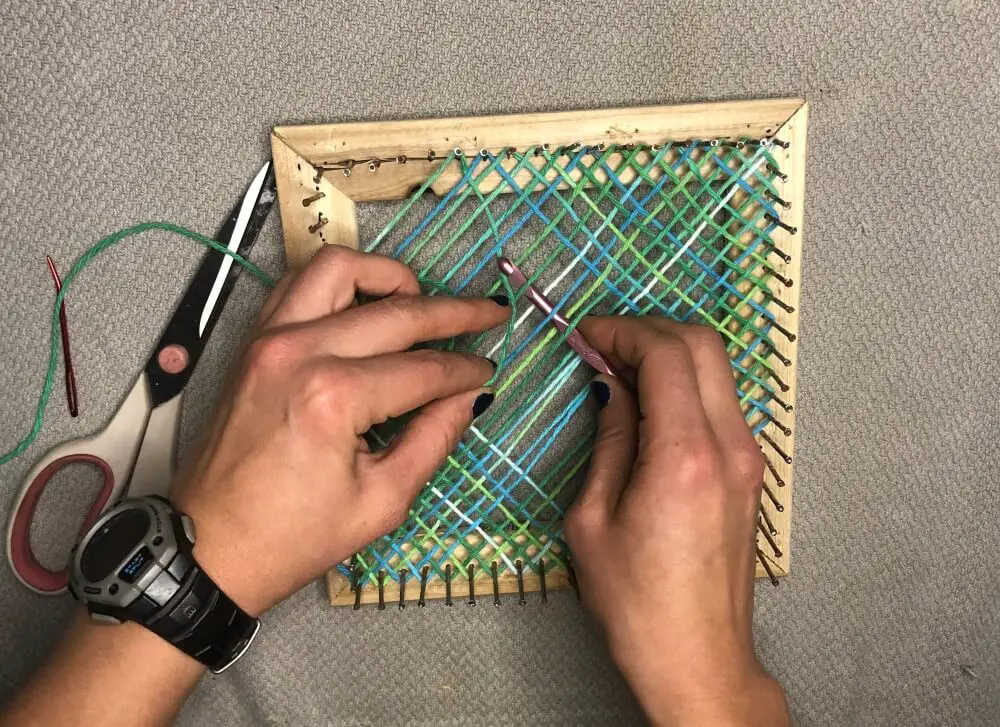
Now that you are to the other side, wrap the thread around the last pin and secure it by going under the first thread on that side. I went over and under a few times just to further secure the end.
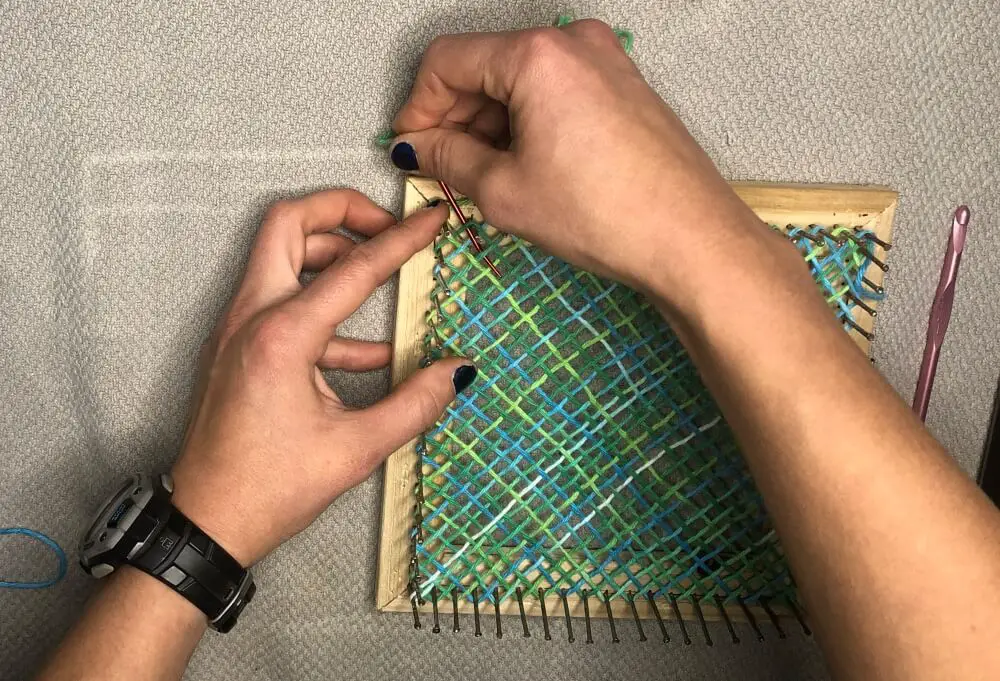
Then, to further secure your thread, you’re going to put your needle through either a single strand of the yarn or, even better, put it through two strands where the warp and weft cross.

That’s the last step! You’ve done the hard parts, now all that’s left is to take it off the loom.
3. Cast-Off the Square
Taking the square off the loom is probably the easiest part. Start with the corner of the loom that you finished on and use your needle, crochet hook, or fingers to slip the loop off the corner pin.
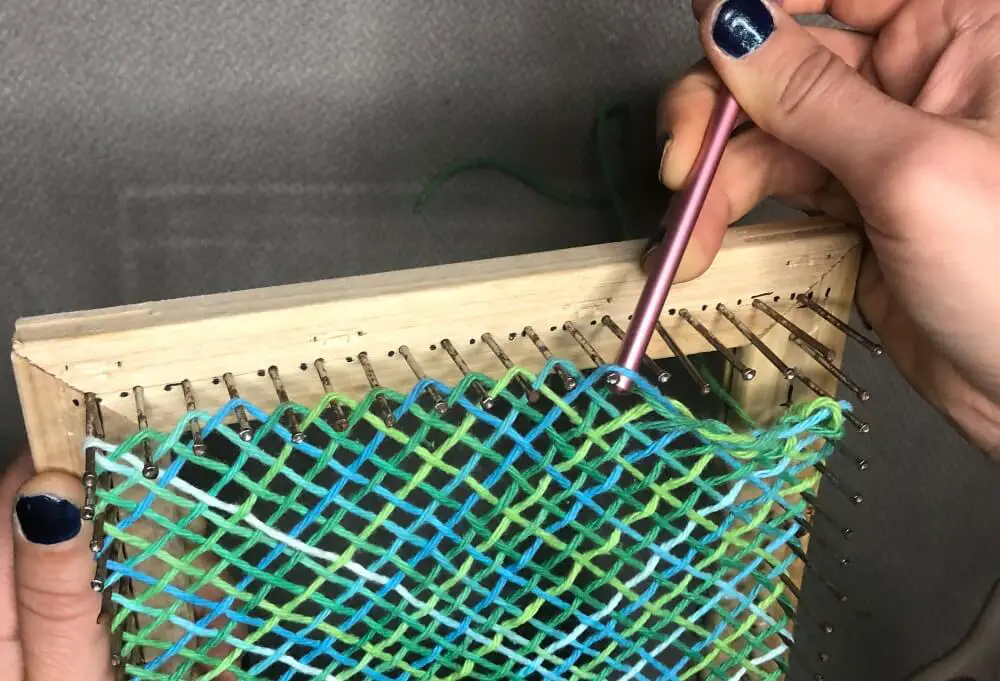
Continue slipping the loops off the pins until you’ve done them all. Don’t worry about anything unraveling, the way the square is woven ensure that it won’t come undone.
And that’s it! I wasn’t kidding when I said it was the easiest part.
4. Finish the Square
The final step to be done with your first pin loom square is to finish your square.
To do this, you just need to wash your square.
If you used cotton or a different plant based yarn, then you can throw your square right in the washing machine.
If you used wool, alpaca or a different animal based fiber, then you should wash your square by hand so the wool doesn’t shrink or felt.
Washing the square fluffs up the fibers which fills in all those gaps that you had in your square. Finishing is also called fulling because it gives the yarn a full appearance.
Once your square has been finished, trim off your yarn tail and admire your handiwork.
Now that you know how to make a little square, here are three projects perfect to make on your pin loom.
3 Easy Pin Loom Projects
These are a ton of different projects you make do with a pin loom, these are just a few ideas for you to get started using your pin loom.
If you want more ideas, I recommend getting the book Pin Loom Weaving: 40 Projects for Tiny Hand Looms by Margaret Stump.
It’s a great book with a ton of projects and patterns as well as great information about pin loom weaving. If you’re interested, you can get it at the Woolery or on Amazon (I’ll get a little commission if you use my links!).
Pot Holders
Pot holders are probably the most common thing people think of when they think of this kind of loom which is why it’s sometimes called a pot holder loom.
This is the perfect project if you need a quick gift for someone or if you want an easy craft for kids.
You can buy a kit from your local craft store that will have everything you need including the loom.
But, if you just made your own pin loom, you can buy the cotton loops separately or you can use some cotton yarn from your yarn stash.
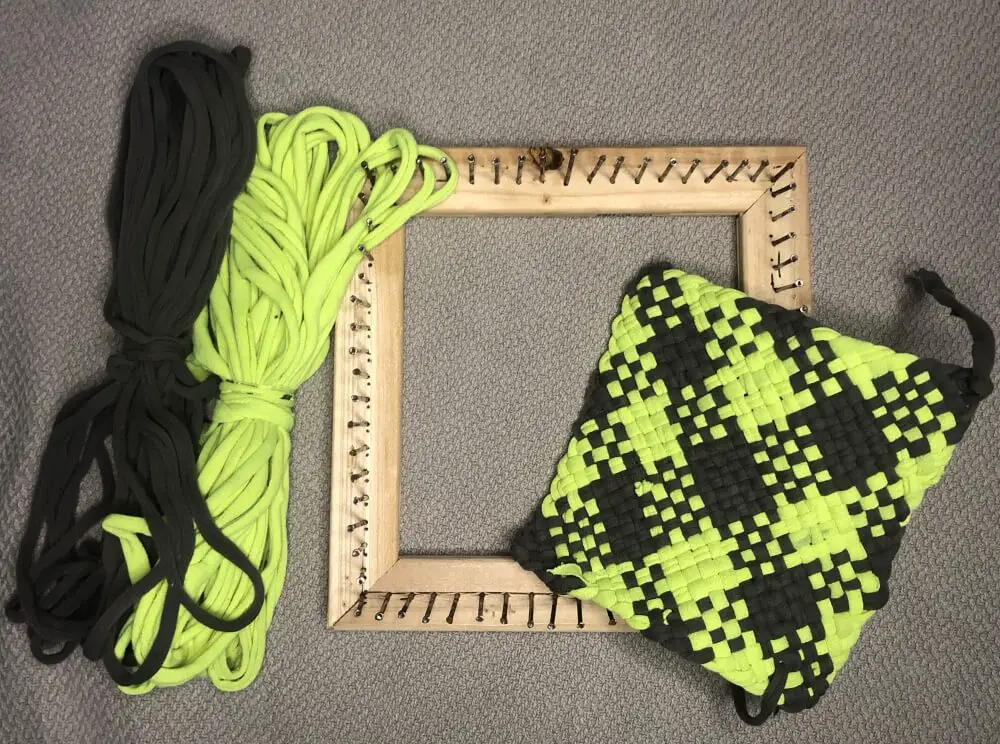
Alternatively, you can use recycled t-shirts to make thick yarn which is what I did for my pot holder pictured above.
However, you want to make sure that the t shirts you use don’t have any synthetic materials in it because synthetic materials will melt when exposed to heat.
To know more about which fibers are safe for heat and microwaves, check out my other post here.
Pin Loom Square Scarf
This project requires you to make multiple pin loom squares and then put them together to form a scarf.
But, it allows you to transform a basic square into a fun patchwork look and it allows you to use a different colors to creat a fun pattern.
Once you have enough squares, you can put them together to either make a perfectly rectangular scarf, or offset them to make your scarf more interesting.
Here’s a great article to inspire you on all the possibilites there are when making a pin loom scarf.
Washcloths
Last but not least, making washcloths is super easy on a pin loom.
This is what I chose to make during the tutorial.
You’ll need cotton yarn for this project and if you wanted to make your cloth scrubby, you can add scrubby yarn and weave the strands two at a time.
Since this project is pretty simple, its a great opportunity to try out a weaving pattern other than plain weave.
The Adventures in Pin Loom Weaving has a great database of a ton of different weaving patterns. Here’s one for a diamond pattern.
When pin loom weaving, the possibilities are limited only by your imagination, I know that’s a little corny but in this case it’s true. Have fun exploring all the possibilites!
